1 What the scheduler does
The End User Scheduler lets administrators create automated deployments for large-scale projects, such as upgrading the organisation's operating systems.
It pre-caches the operating system upgrade automatically. With a customisable splash screen, end users can schedule or skip the upgrade. From the Status window, administrators get a quick overview of how far the upgrade has got and can export the data.
Everything is configured from the configuration page for the End User Scheduler, which is located under the Settings menu. The picture is an earlier version of that menu; the current menu was not recaptured.

To set up an upgrade, follow these steps:
- Import the new Operating System Upgrade Package into the SCCM server.
- SoftwareCentral automatically creates two new task sequences for pre-caching and upgrading the operating system.
- Modify driver packages in the pre-cache task sequence if needed.
- Create and configure the end user splash screen.
- Let your end users decide when to perform the upgrade, within a predefined time frame.
- Get a detailed compliance report from the Status page.
The main window has these buttons in the left menu: Add new Scheduler, Deploy Scheduler, Copy Task Sequence and a search box. The list shows each scheduler with its Deployment ID and Is deployment value, and the links Status, Edit and Delete.
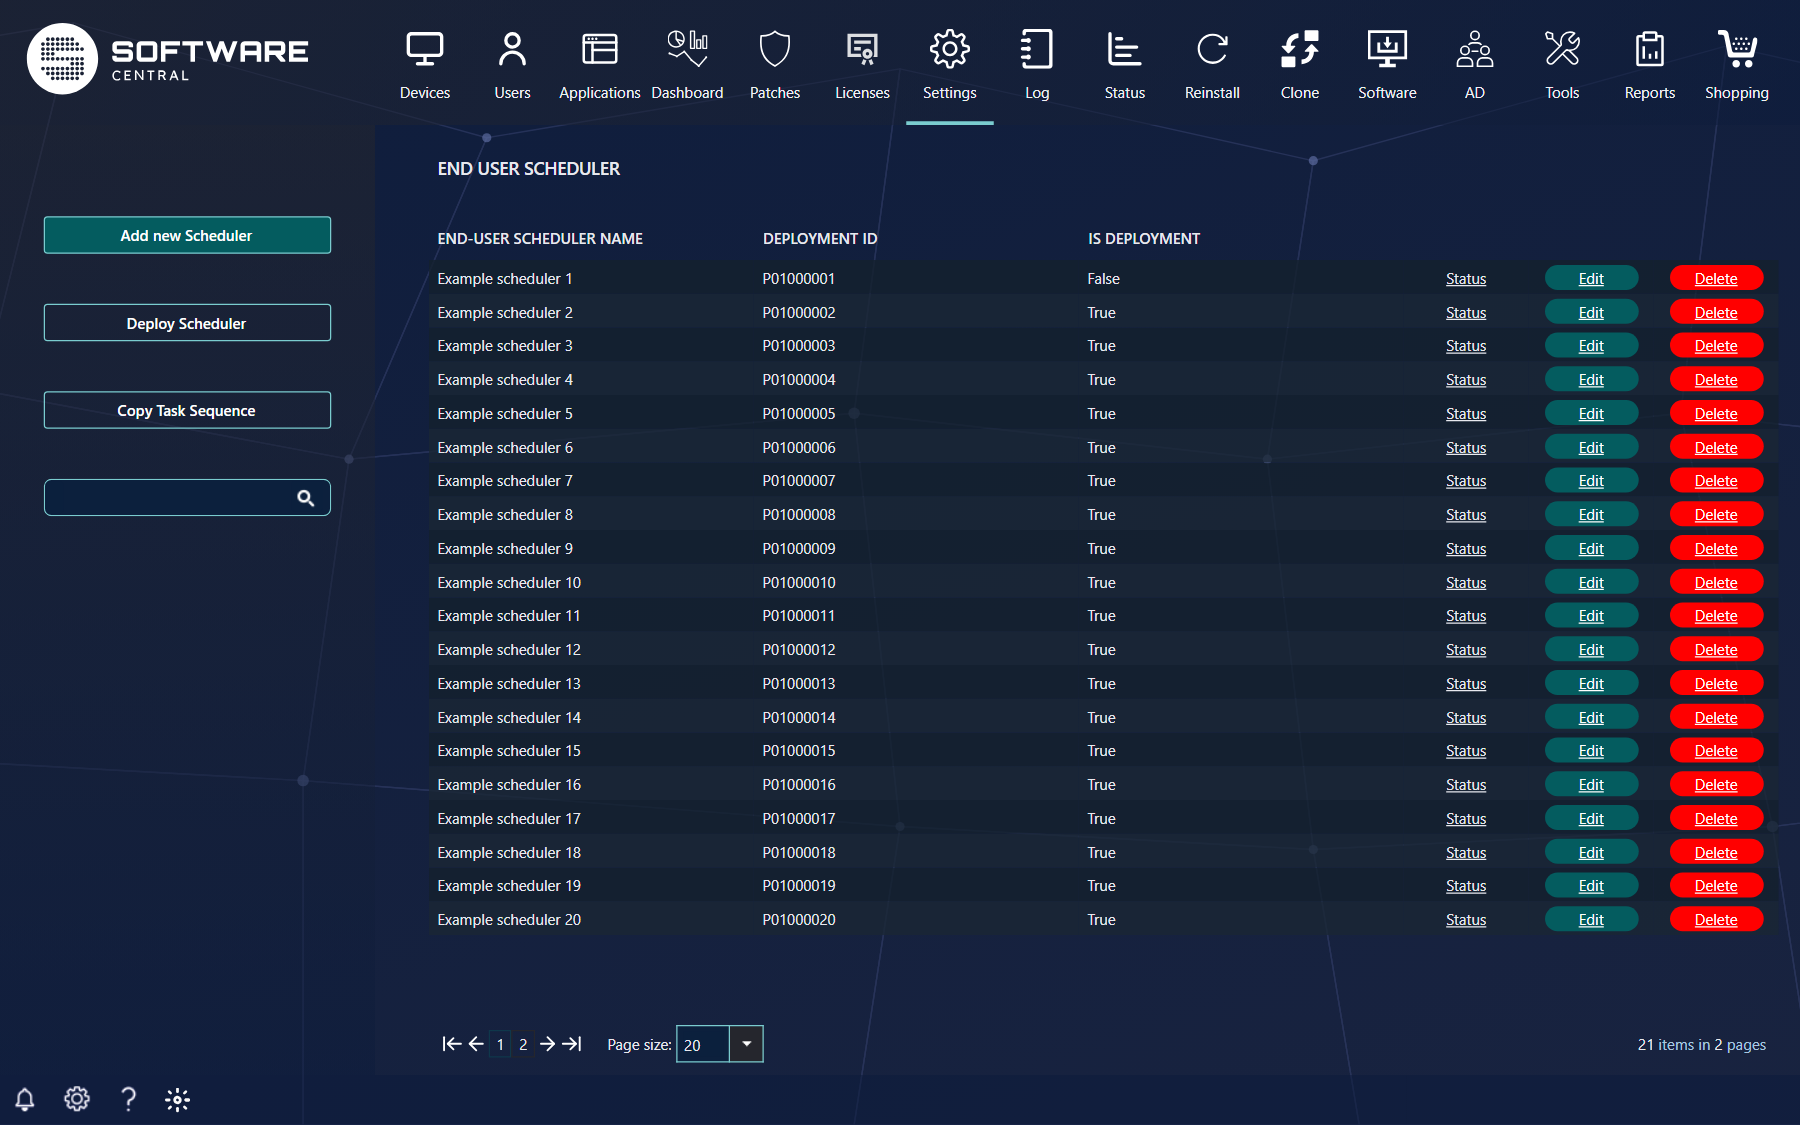
Deploy Scheduler creates a scheduler for a set of computers you select. Such a scheduler is listed with Is deployment set to True; see Edit and delete schedulers for what that changes when you delete it.
2 Create a new operating system upgrade
Start by importing the new Operating System Upgrade Package with SCCM, and distribute it to the appropriate distribution points.
Then click Copy Task Sequence in the left menu.
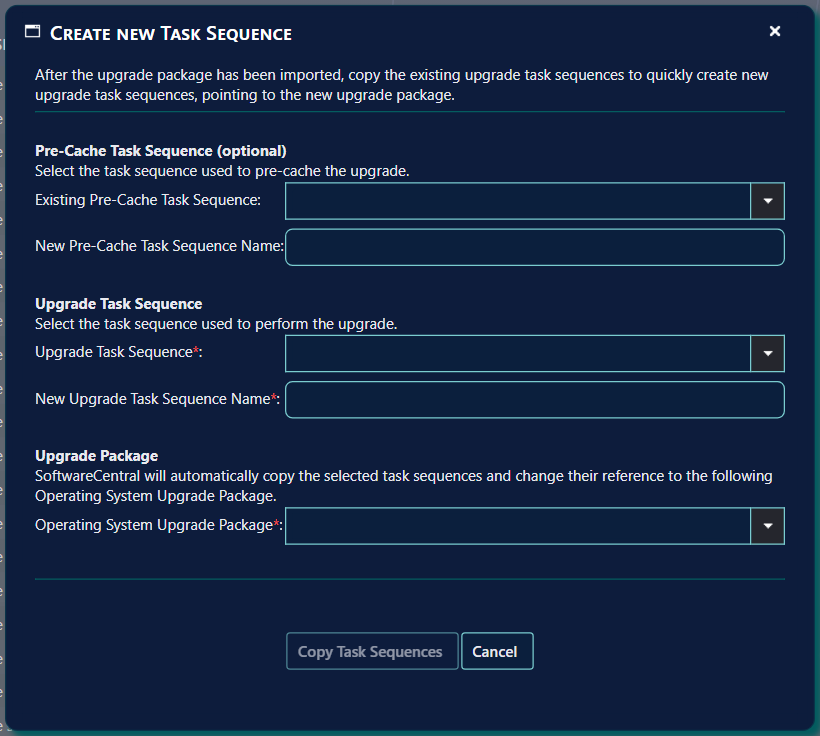
A new window will open. From the new window, select the previous used pre-cache and upgrade task sequences. Name the new task sequences. Finally select the new Operating System Upgrade Package.
| Field | What to choose |
|---|---|
| Existing Pre-Cache Task Sequence | The pre-cache task sequence to copy. The label says it is optional. |
| New Pre-Cache Task Sequence Name | The name of the copy. The window asks for this name whenever an upgrade task sequence is selected, so enter one even if you leave the existing pre-cache task sequence empty. |
| Upgrade Task Sequence | The task sequence that performs the upgrade. Required. |
| New Upgrade Task Sequence Name | The name of the copy that performs the upgrade. Required. |
| Operating System Upgrade Package | The new upgrade package. The copies refer to this package. Required. |
Click Copy Task Sequences. SoftwareCentral will now copy the existing task sequences and change the variables pointing to the Operating System Upgrade Package. It will also create new collections and deploy the task sequences to those collections.
Task Sequences and Collections will be placed in the same folders as the originals.
The advantage of copying the existing task sequences is that any custom steps will be added to the new task sequences.
Once the new task sequences have been created, you can modify the driver packages in the pre-cache task sequence if needed.
If you want to pre-cache any additional packages, you must do that in a separate step, before the pre-cache OS step. The picture below is from the Configuration Manager console (an external product); it shows the PreCache Packages step placed before PreCache OS.

3 Create a scheduler and splash screen
To add a new scheduler, click Add new Scheduler in the left menu. A new window will open.
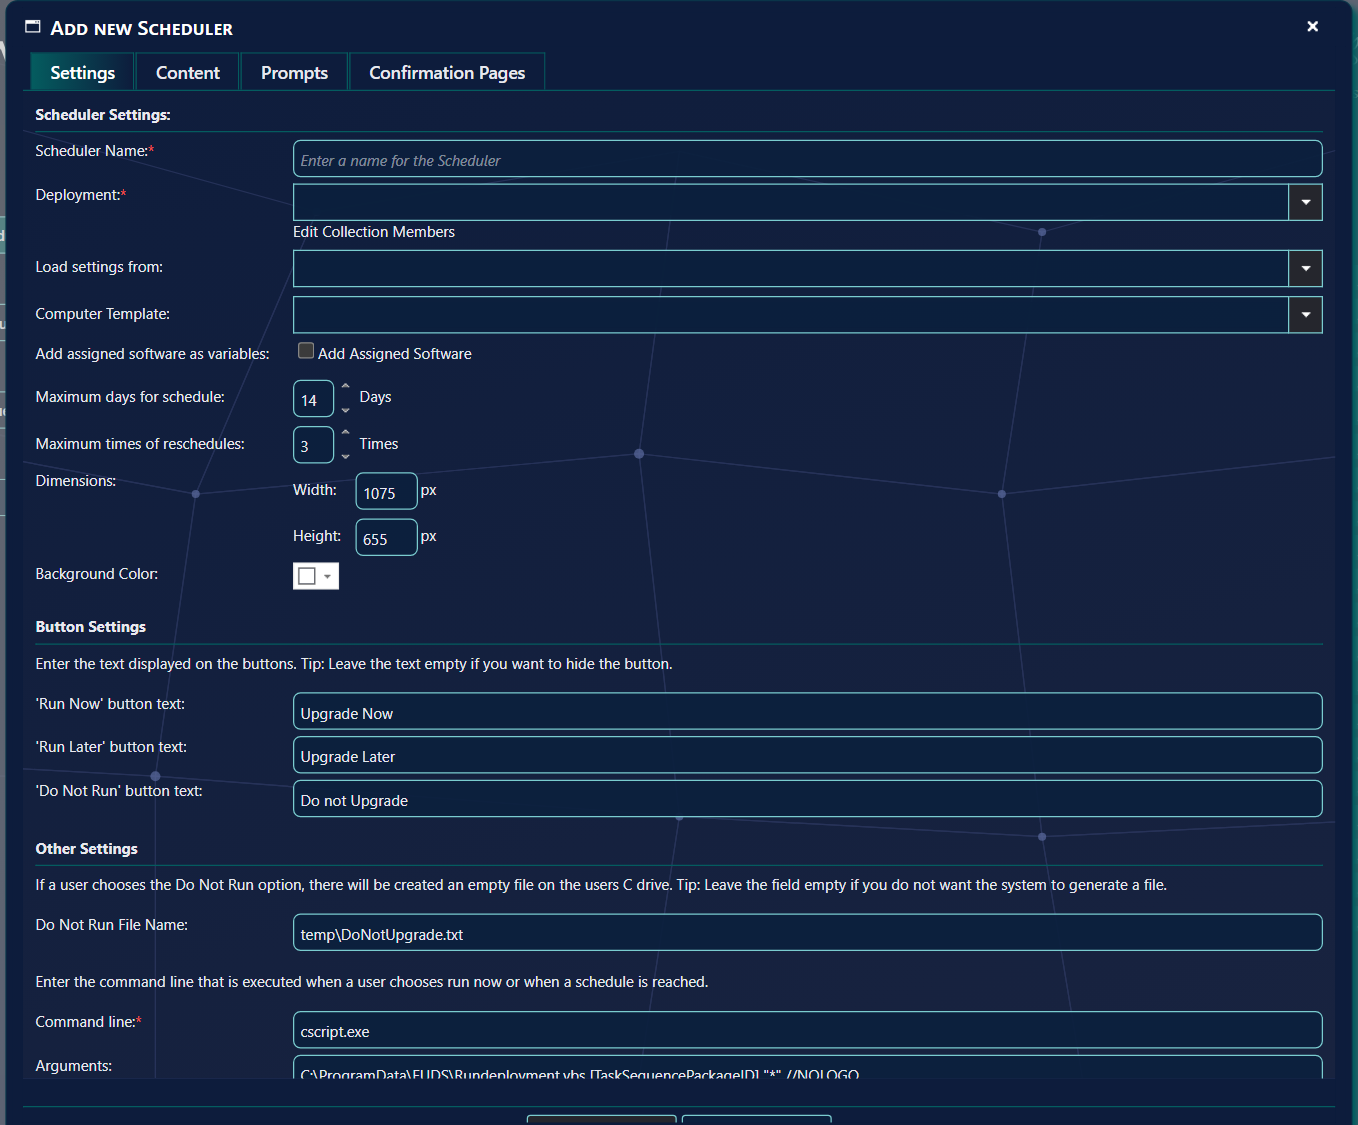
Give the new Scheduler a name in Scheduler Name, and select the deployment of your new upgrade in Deployment. Both are required. The arguments are auto generated when you select a deployment.
Note that under Other Settings you must also provide a command line, for executing the actual upgrade. The Command line box starts with cscript.exe, and Arguments is filled in for you. If the arguments include a PowerShell script (.ps1), the command line changes to the Windows PowerShell program.
Once the scheduler is saved, you can see a preview of it: the Open Preview link becomes available. You can change the design of your scheduler any way you like with the HTML editors on its tabs. The changes take effect only after you save.
End users may run this tool from a PowerShell script. An example of this PowerShell script with the required values will appear in the PowerShell Example box, once the scheduler is saved. The picture is from a saved scheduler.

Copy the script to a new ps1 file and configure and deploy it to all computers, which are a member of the upgrade OS collection.
Set the script to launch at startup.
End users will now be presented by the splash screen and may choose when to perform the operating system upgrade.
| Setting | What it does |
|---|---|
| Scheduler Name | The name of the scheduler. Must be unique (names are compared without regard to capitals). |
| Deployment | The deployment the scheduler runs. Required. |
| Maximum days for schedule and Maximum times of reschedules | How far into the future a user may schedule the upgrade, and how many times the user may schedule it, including the first time. The default is 14 days and 3 times. |
| Dimensions and Background Color | The size of the splash screen (default 1075 by 655 px) and its background. |
| 'Run Now' button text, 'Run Later' button text, 'Do Not Run' button text | The text on the three buttons. The defaults are Upgrade Now, Upgrade Later and Do not Upgrade. Leave the text empty to hide a button. |
| Do Not Run File Name | If a user chooses the Do Not Run option, an empty file with this name is created on the user's C drive. The default is temp\DoNotUpgrade.txt. Leave the field empty if you do not want a file created. |
| Command line | The command that runs when a user chooses run now or when a schedule is reached. Required. The default is cscript.exe. |
| Run as AD-Group (optional) | Leave the field empty to run the task as the SoftwareCentral Service Account. To let users interact with the task, select the Domain Users group. |
4 Status
Click Status on the row of a scheduler to open the status window. It lists all computers the deployment is deployed to.
Use the drop-down box on top of the grid to show Show All, Show Run Now, Show Scheduled, Show Do Not Run or Show Missing. You can also use the filter boxes in the header of each column.
You can export the currently viewed computers to a CSV file using the export button in the upper right-hand corner of the grid.
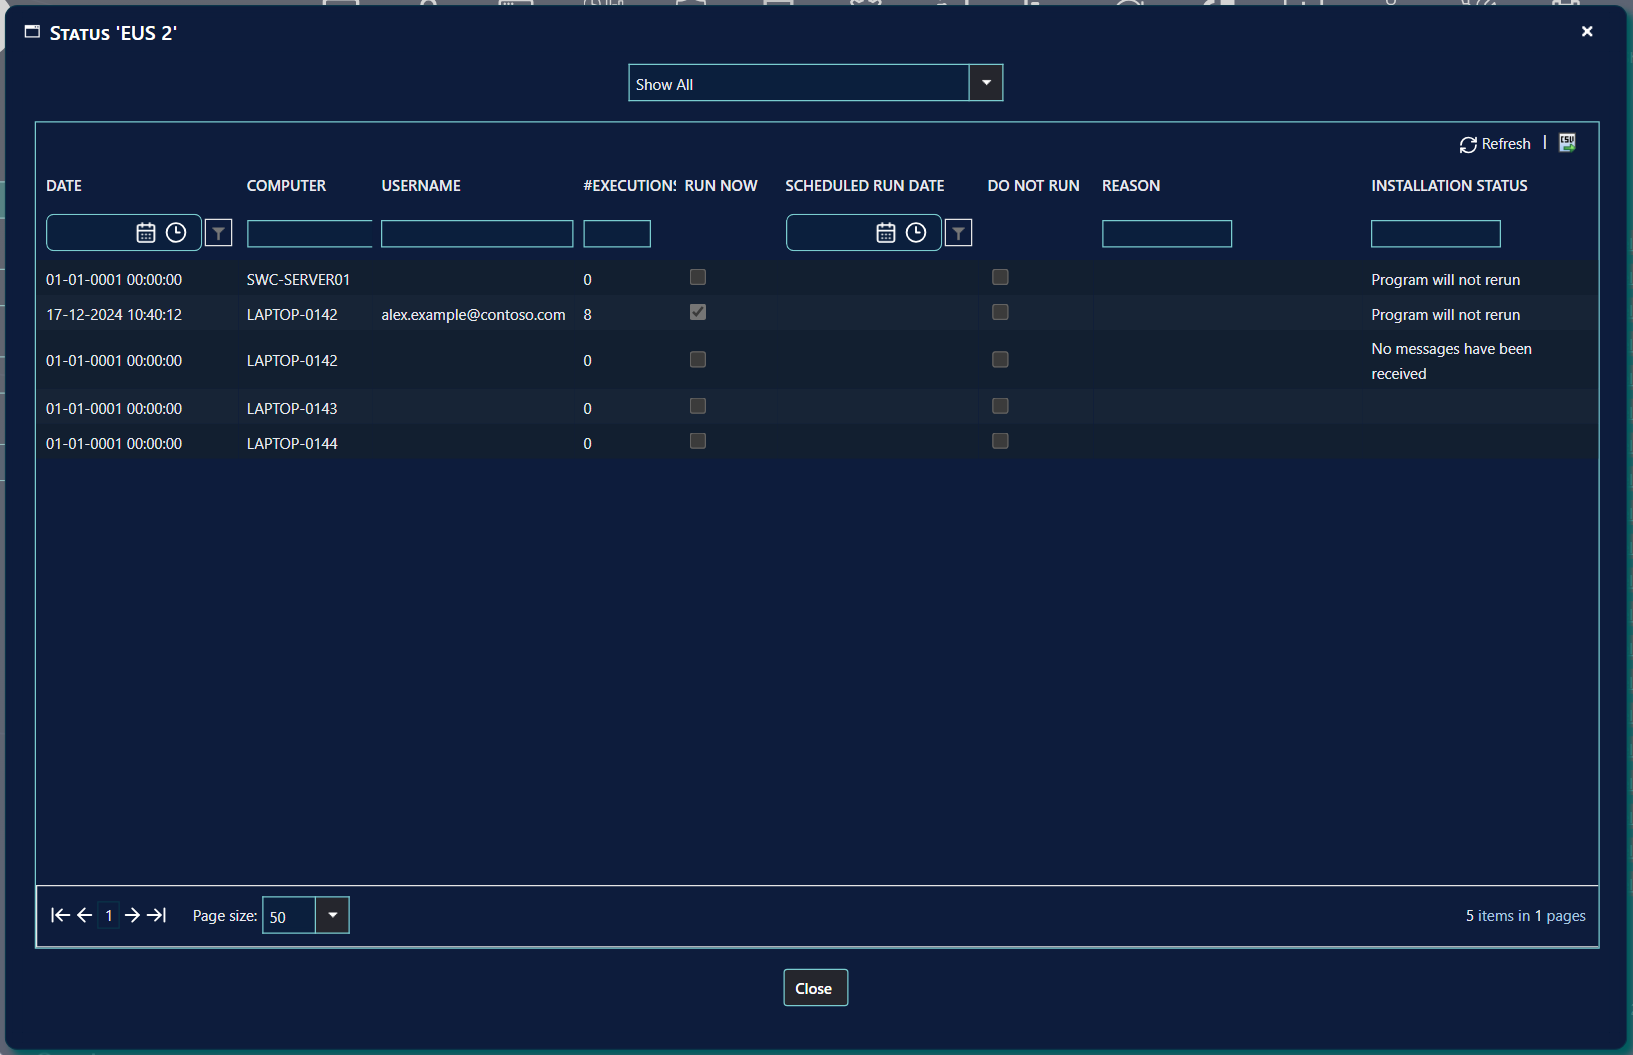
| Column | What it tells you |
|---|---|
| Date | The date and time stored for the record. It shows 01-01-0001 00:00:00 when nothing has been stored yet. |
| Computer and Username | The computer and the user who was logged on. |
| #Executions | The number of executions stored for the computer. |
| Run Now, Scheduled Run Date, Do Not Run, Reason | Whether the user chose to run now, the time the upgrade is scheduled for, whether the user chose not to run, and the reason given. |
| Installation Status | The status message of the upgrade on the computer, for example No messages have been received or Program will not rerun. |
5 Edit and delete schedulers
To edit a Scheduler, click Edit on its row. The window has the same tabs as the Add new Scheduler window: Settings, Content, Prompts and Confirmation Pages.
To delete a Scheduler, click Delete on its row. A confirmation asks Do you want to delete the scheduler's name. Note that when you delete a scheduler, all historical data from the status list is also removed.
If you delete a Scheduler that is not a deployment (Is deployment is False), the upgrade itself is not deleted and clients will still be upgraded.
To stop an upgrade, you must remove the clients from the collections.
This can be achieved from the Collection Management interface.
6 API
You can read more about the API here: End User Scheduler API.
7 Best practice
- Save before you test. The preview link and the PowerShell example appear only after a save, and the changes you made take effect only when you save.
- Do not delete a scheduler to stop an upgrade. Deleting it removes its status history. To stop the upgrade, remove the clients from the collection.
- Check Is deployment before you delete. A scheduler from Deploy Scheduler also deletes its collection.
- Pre-cache additional packages before the pre-cache OS step. They must be in their own step, placed before the OS step in the pre-cache task sequence.
- Keep Run as AD-Group empty unless users must interact. An empty field runs the task as the SoftwareCentral Service Account; the Domain Users group lets users interact with it.
8 Troubleshooting
| Symptom | Cause | What to do |
|---|---|---|
| “A name is required.” in the scheduler window | Scheduler Name is empty. | Enter a name. |
| “This name already exists.” | Another scheduler has the same name. | Choose a different name. |
| “Deployment ID is required.” | No Deployment is selected. | Select the deployment of the upgrade. |
| “Command line is required.” | Command line is empty. | Enter the command line, for example cscript.exe. |
| “Failed to save end user scheduler” | The scheduler could not be saved. | Open the Log and look for the entry that explains the failure, then try again. |
| “You must select an upgrade task sequence.” or “You must select an operating system upgrade package.” | A required field in the Create new Task Sequence window is empty. | Select the task sequence or the upgrade package. |
| “Pre-Cache Task Sequence cannot be the same as the Upgrade Task Sequence.” | The same task sequence is chosen for both. | Choose a different pre-cache task sequence. |
| “The new Pre-Cache Task Sequence must be given a name.” or “The new Upgrade Task Sequence must be given a name.” | A name for the copy is empty. | Enter the name. |
| “The new Pre-Cache Task Sequence name already exists.” or “The new Upgrade Task Sequence name already exists.” | A task sequence with that name already exists. | Choose a different name. |
| “The task sequence names cannot be the same.” | The pre-cache and upgrade copies have the same name. | Give each copy its own name. |
| “Please select some resources.” in Deploy Scheduler | No computers were selected. | Select the computers, then deploy again. |
| “No End-User Schedulers match your criteria” | There are no schedulers, or the search matches none of them. | Clear the search, or check that the scheduler exists. |
| “No computers found” in Status | No computer has reported to this scheduler yet, or the filter excludes them all. | Choose Show All and clear the filter boxes. Wait for the computers to report. |
| Open Preview does nothing | The scheduler has not been saved yet. | Click Save, then open the preview. |