1 Open the device list
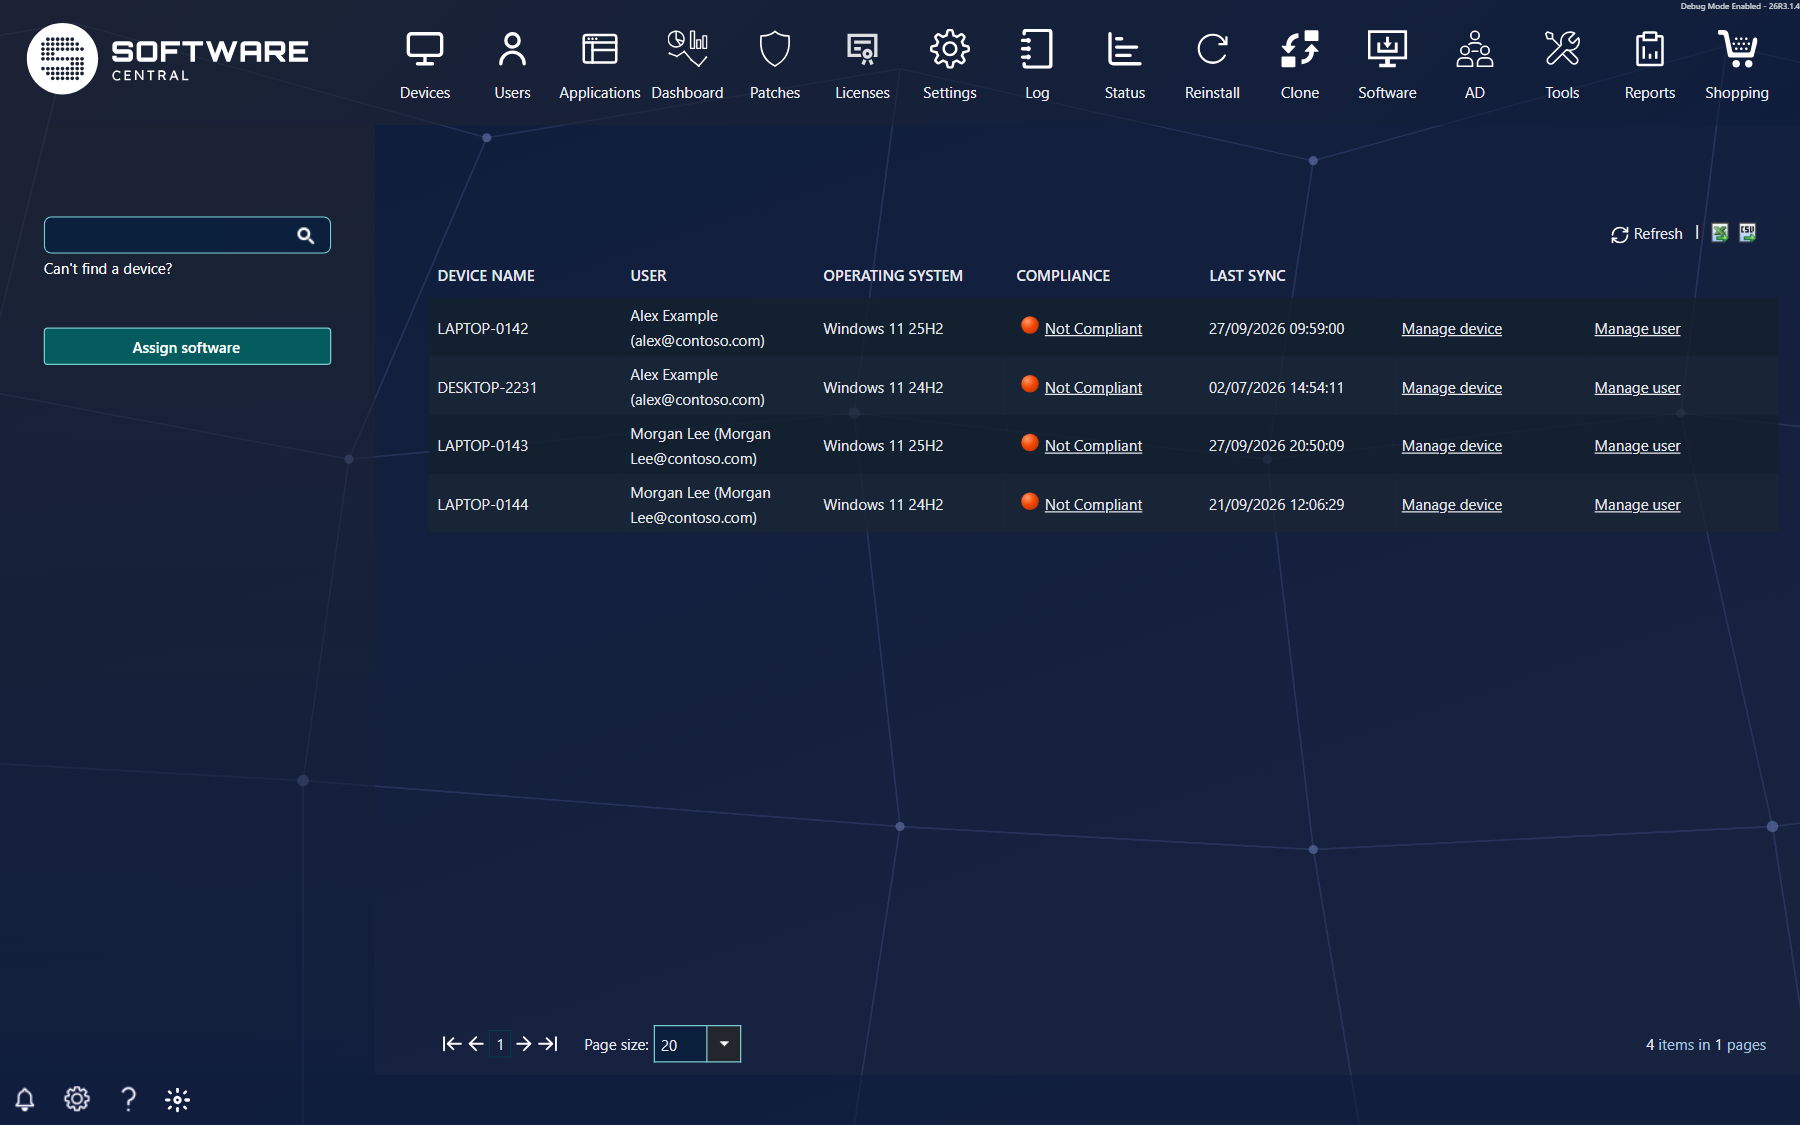
The Manage Intune Endpoints interface is located under the Software / Endpoints menu button.
From the interface you can see the managed devices from Intune and work with them. You can manage devices: send device actions, see compliance status and assigned software, and monitor the install status of applications. You can also install and uninstall applications on multiple devices, users or groups.
2 Find a device or user
Use the search box in the left menu to look up a device or a user.
You can search by:
- Device name
- Device ID (the ID of the managed device in Intune, or the Entra ID device ID)
- Operating system and version
- User display name
- User principal name
3 Open a device
Click Manage device on a row. A new window opens with tabs for the device.
| Tab | What it shows |
|---|---|
| Device info | The device details, the device ownership, the primary user, the BitLocker recovery keys and the local administrator password. |
| Device actions | The actions you can run on the device, and the Device Action Log. |
| Assigned software | The applications assigned to the device, and the applications you can assign. |
| Configuration Profiles | The configuration profiles that affect the device, and their status. |
| Compliance Policies | The compliance policies the device must meet, and their status. |
| Group Memberships | The Entra ID groups the device is a member of. This tab is shown only when your security role may see device group memberships and the Active Directory module is enabled. |
4 Device info
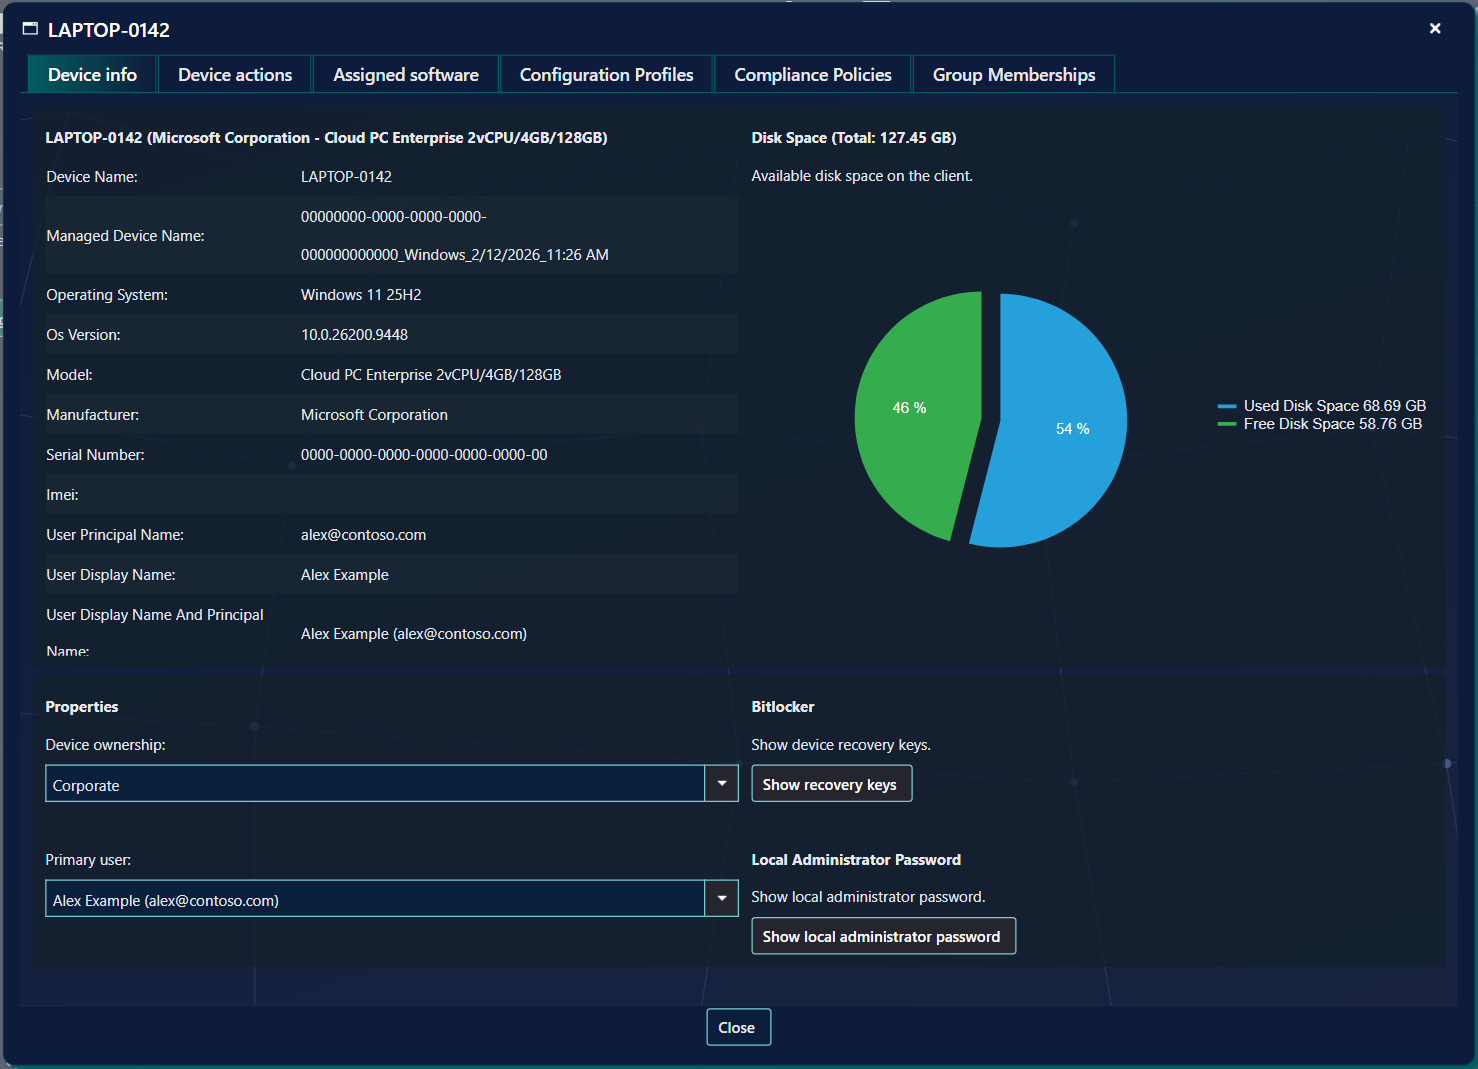
The device info tab gives an overview of common device information, such as the model, the operating system version and the disk space.
Device ownership
From the properties section, you can change the device ownership type. You can choose between Personal and Corporate.
The device ownership type determines which data Intune collects about the device and which device actions are available.
Primary user
See and change the primary user of the device. If no user is selected, the device is considered a shared device, and the box shows Shared device.
Choosing a new primary user changes the device in Intune. You need the right to set the primary user.
Bitlocker
Click the Show recovery keys button to open a window with the Bitlocker recovery key(s) for the device. You need the right to show BitLocker recovery keys.
Local administrator password
Click the Show local administrator password button to show the local administrator password of the device. You need the right to use the Local Administrator Password (LAPS) function. Keep the password on screen only as long as you need it.
5 Device actions
The Device actions tab runs actions on the selected device. The available actions depend on your permissions, the device type and, for some actions, the device ownership type.
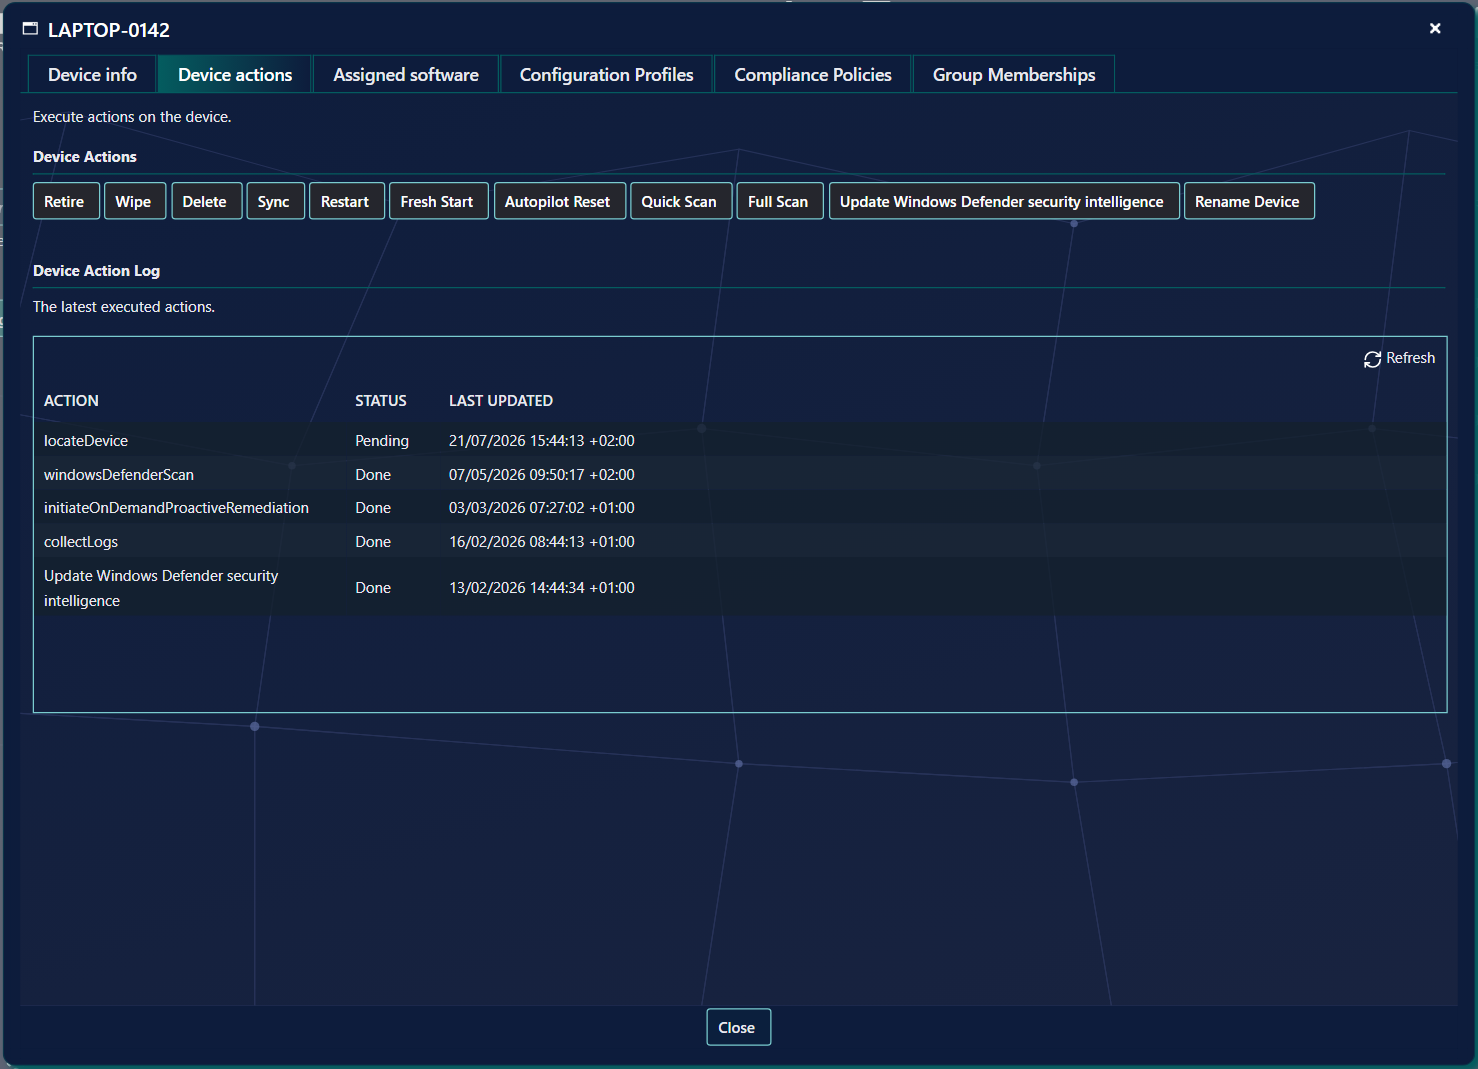
The Device Action Log displays the last device actions performed on this device. It may also contain important information, such as new passcodes and recovery keys. Only people who are allowed to see the log should look at it.
Available actions
| Device Action | Available on | Description |
|---|---|---|
| Retire | Windows, Mac, iOS, Android | Removes company data managed by Intune. The user’s personal data is not removed. |
| Wipe | Windows, Mac, iOS, Android | Factory reset returns the device to its default settings. This removes all personal and company data and settings from this device. You can choose whether to keep the device enrolled and the user account associated with this device (on Windows, tick Keep enrollment and user data.). On Mac, enter the six-digit MacOS Recovery Pin and choose the Obliteration Behavior. You cannot revert this action. |
| Delete | Windows, Mac, iOS, Android | Delete the device from Intune. You will no longer be able to view or manage the device from the Intune portal. The device will no longer be allowed to access your company’s corporate resources. Company data may be wiped from the device if the device tries to check-in after it is deleted. |
| Sync | Windows, Mac, iOS, Android | SoftwareCentral will attempt to check in with the device. If successful, it will sync current actions or policies to the device. |
| Restart | Windows | Reboots the device. Users will not be automatically notified of the restart, and might lose unsaved work. |
| Fresh Start | Windows | This will remove all preloaded Win32 apps. You can choose whether to retain user data on the device. |
| Autopilot Reset | Windows | Resets the device with Windows Autopilot. A prompt asks you to confirm first. |
| Quick Scan | Windows | Windows Defender quick scan looks at all the locations on the device where there could be malware registered to start with the system, such as registry keys and known Windows startup folders. A quick scan helps provide strong coverage for both malware that starts with the system and kernel-level malware. |
| Full Scan | Windows | Windows Defender full scan checks all files and running programs on the device hard disk for malware. This scan could take longer than one hour. |
| Update Windows Defender security intelligence | Windows | Updates Windows Defender malware definitions for the device. |
| Rename Device | Corporate owned device, Windows, Mac | This is only available for corporate owned devices. Renames the device. |
| Remote Lock | Mac, iOS, Android | This action is intended to lock lost devices. While the device is locked, it will be unusable. For Mac’s a six-digit recovery pin will be generated and displayed in the Device Action Log for 7 days. This PIN will be required to restore functionality to this device. Be sure to give the PIN to the device owner. For iOS and Android devices, users with the passcode will be able to unlock the device. |
| Enable Lost Mode | iOS | Puts the device in lost mode. A prompt asks for a Message and a Phone number, and both are required. While lost mode is on, the button reads Disable Lost Mode. |
| Remove Passcode | iOS | Removes the passcode. Users will be able to access the device without a passcode until a new one is set. |
| Send Custom Notification | iOS, Android | Sends a custom notification with your own title and message. Custom notifications might be visible on lock screen and to Android apps. Be careful when using them to share sensitive information. The title can be no longer than 50 characters. The Body can be no longer than 500 characters. |
| Reset Passcode | Android | Resets the passcode for the device. A new passcode will be generated and displayed in the Device Action Log for 7 days. |
6 Assigned software
The assigned software tab shows the applications assigned to this device.
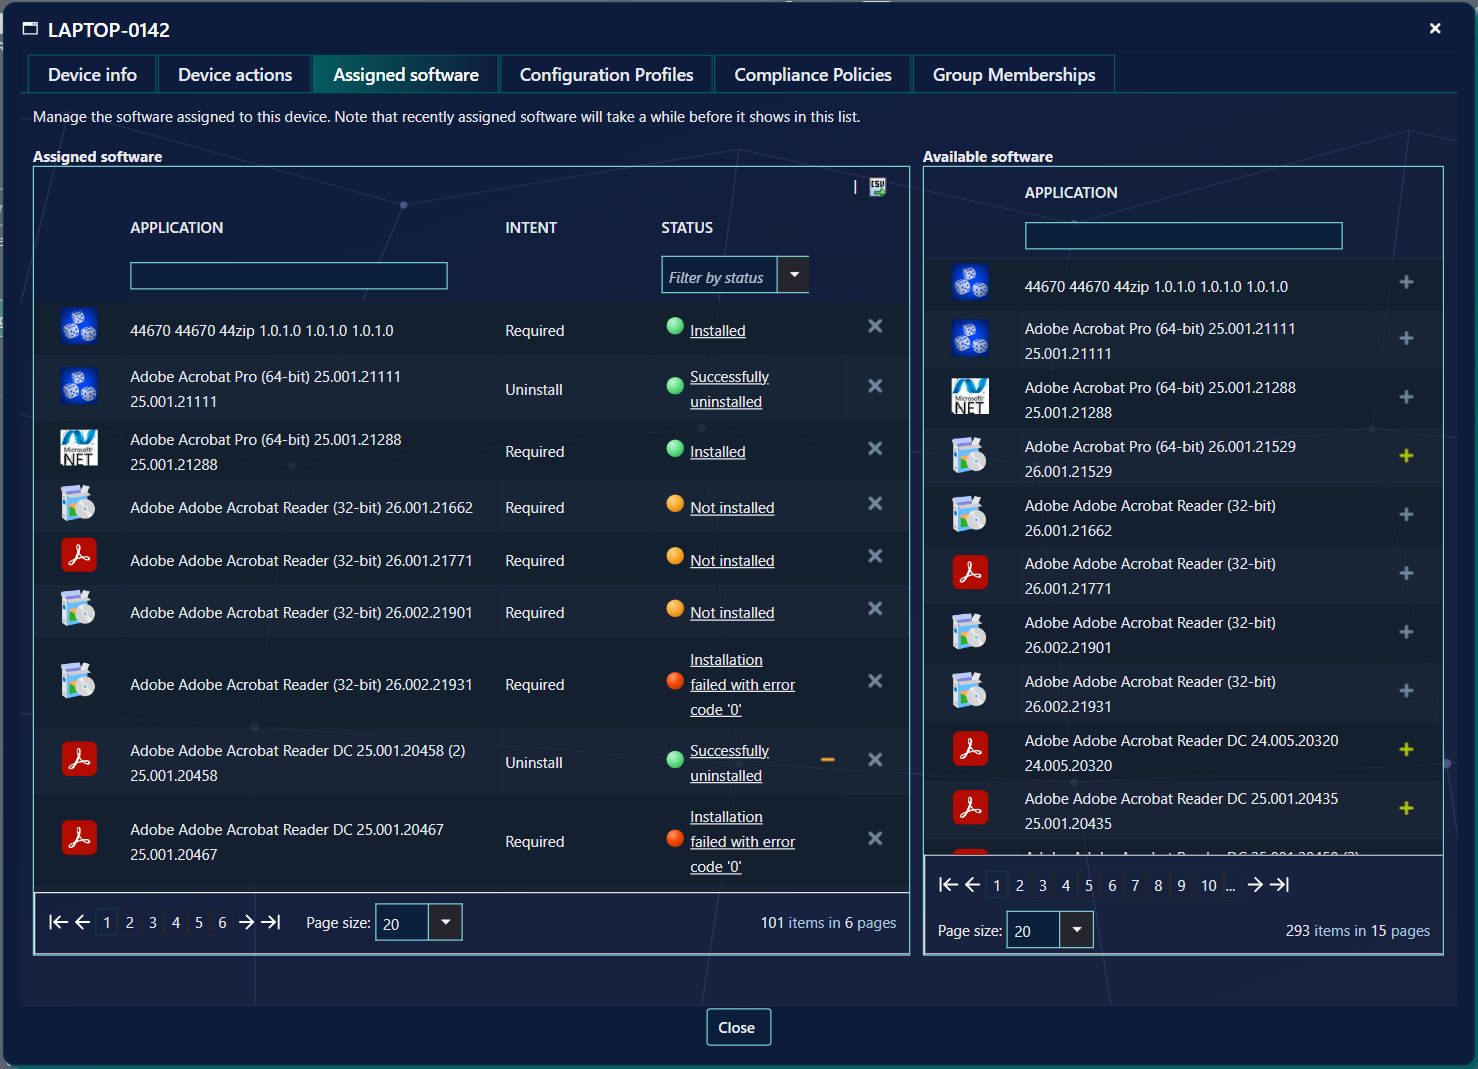
In the first grid (to the left) you can see software assigned to the device. You can see the intent (Required, Available or Uninstall) and the status.
If you click on the status, a window with detailed information opens. This can help you find out why an installation has failed.

You can assign applications from the grid to the right by clicking on the green plus icon. Before the app is assigned, a prompt opens asking you to confirm the action.
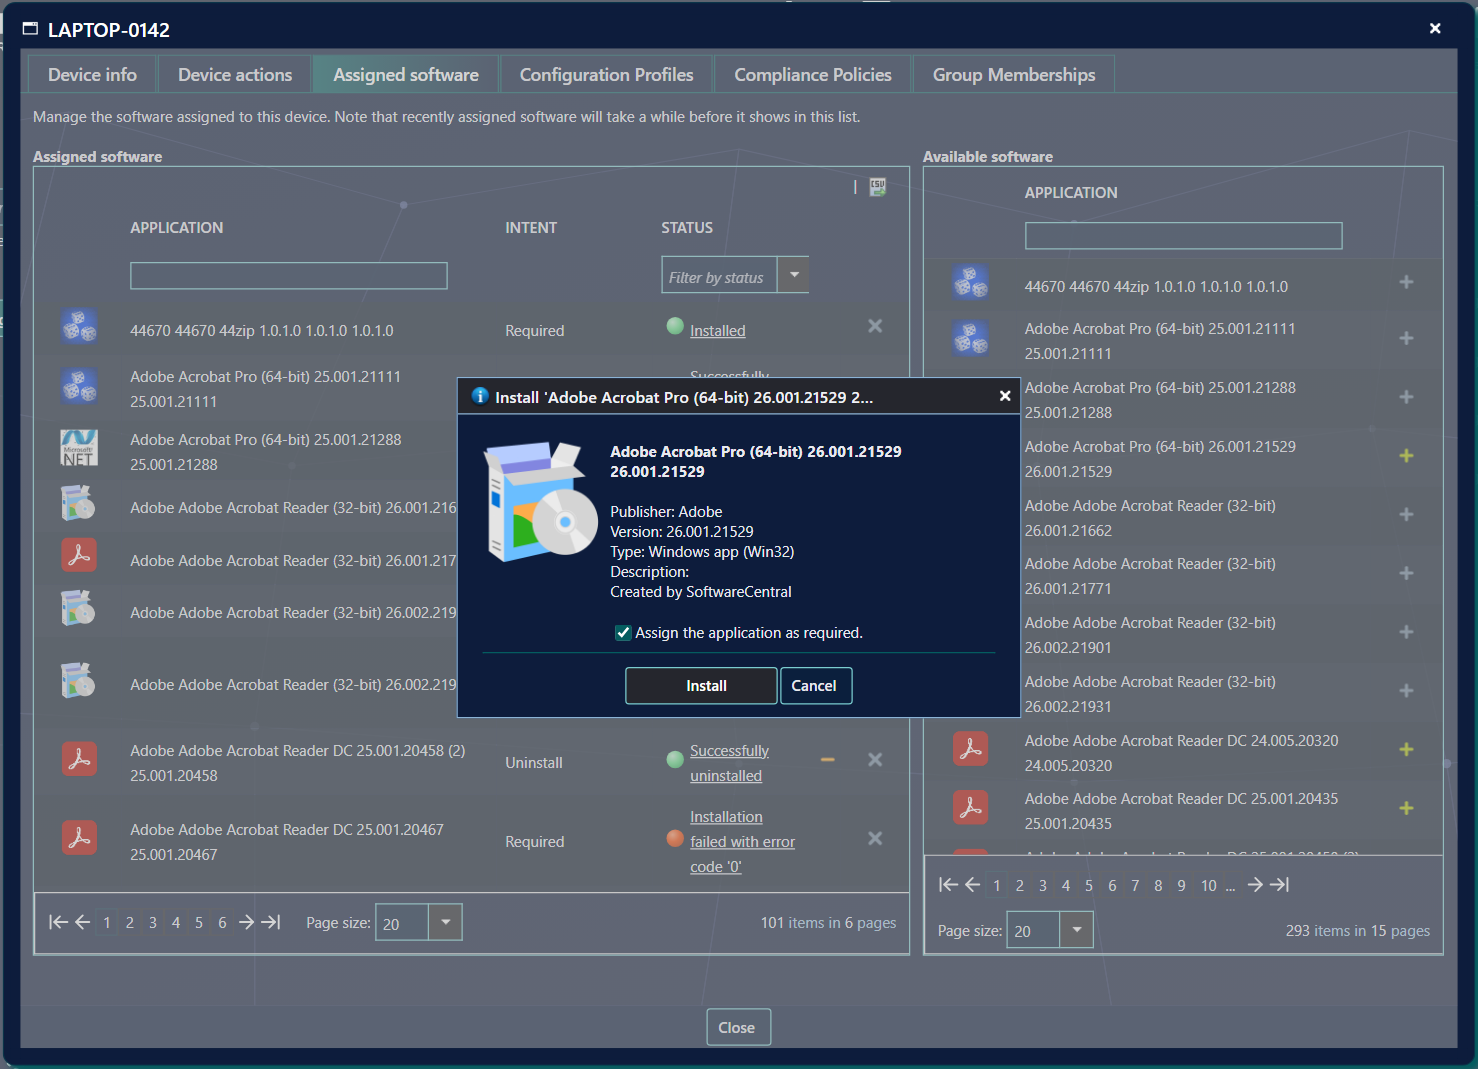
You can choose to assign the app as required. If this is selected, the app will be installed on the user’s device, without user interaction. Meaning that the user will not have to go into the company portal to install the app. The user cannot choose to uninstall required apps.
If you do not assign the app as required, the app will be made available in the company portal, but will not be automatically installed.
7 Configuration profiles
The configuration profiles tab displays the configuration profiles assigned to the device.
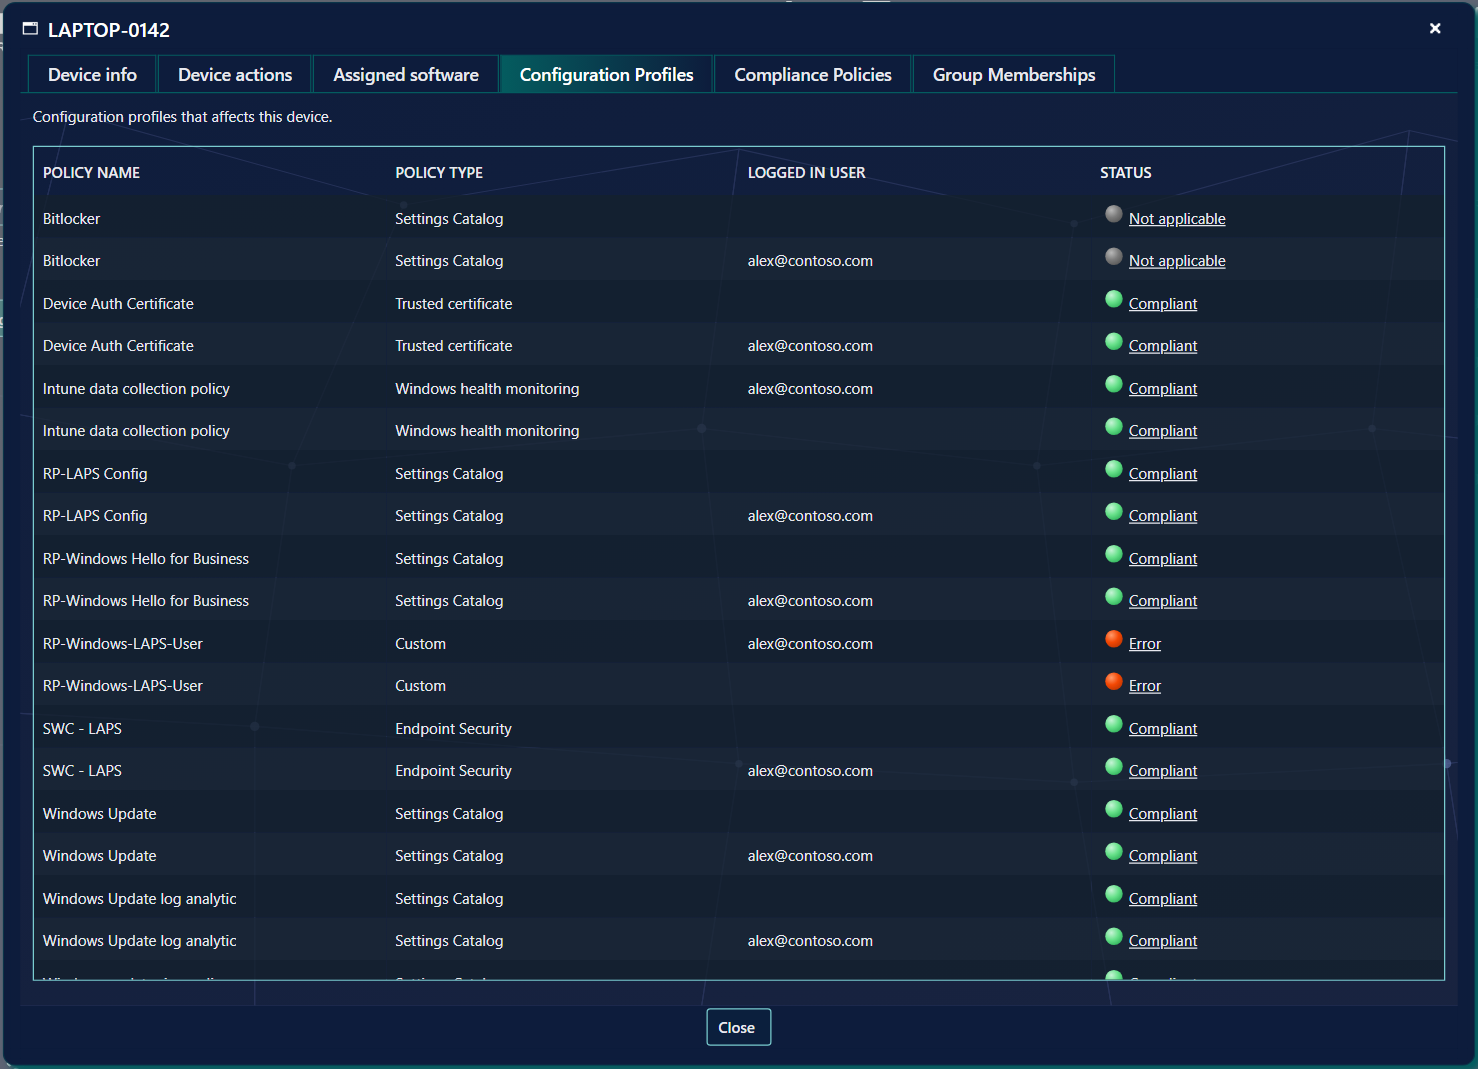
From the status column, you can click on a status to see detailed information on why the configuration profile has failed.
In the example below, you can see a configuration profile that has a setting that is in conflict with another configuration profile.

8 Compliance policies
From the Compliance Policies tab you can see the compliance policies assigned to the device.
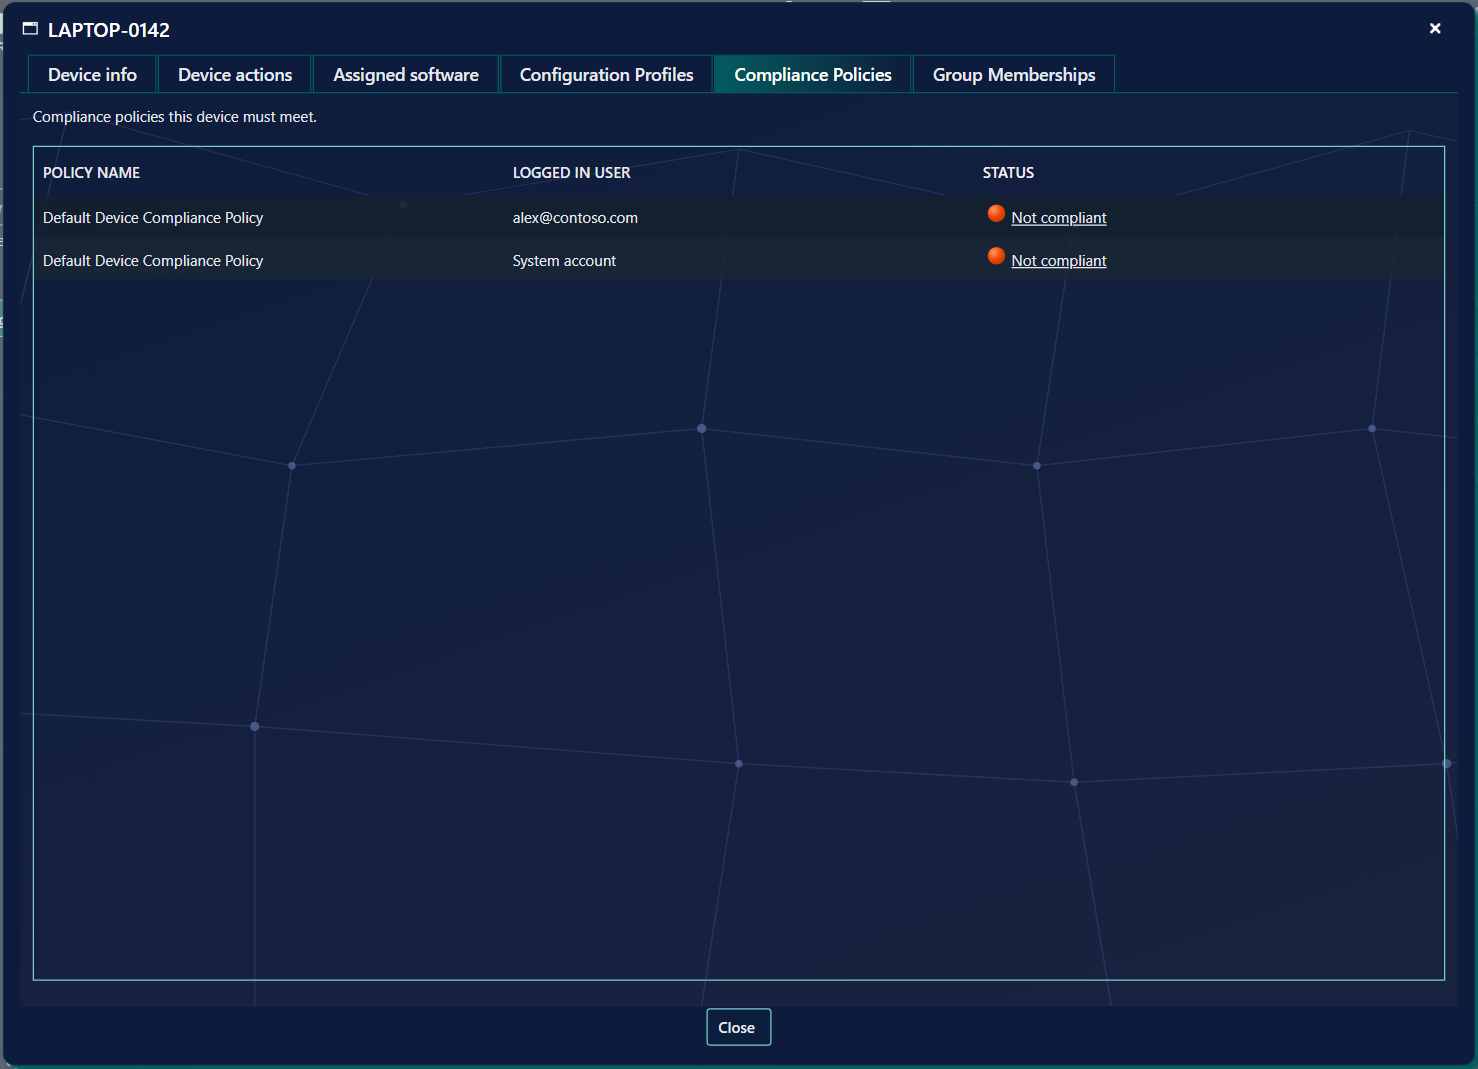
From the status column, you can click on a status to see detailed information on why the compliance policy is not compliant.
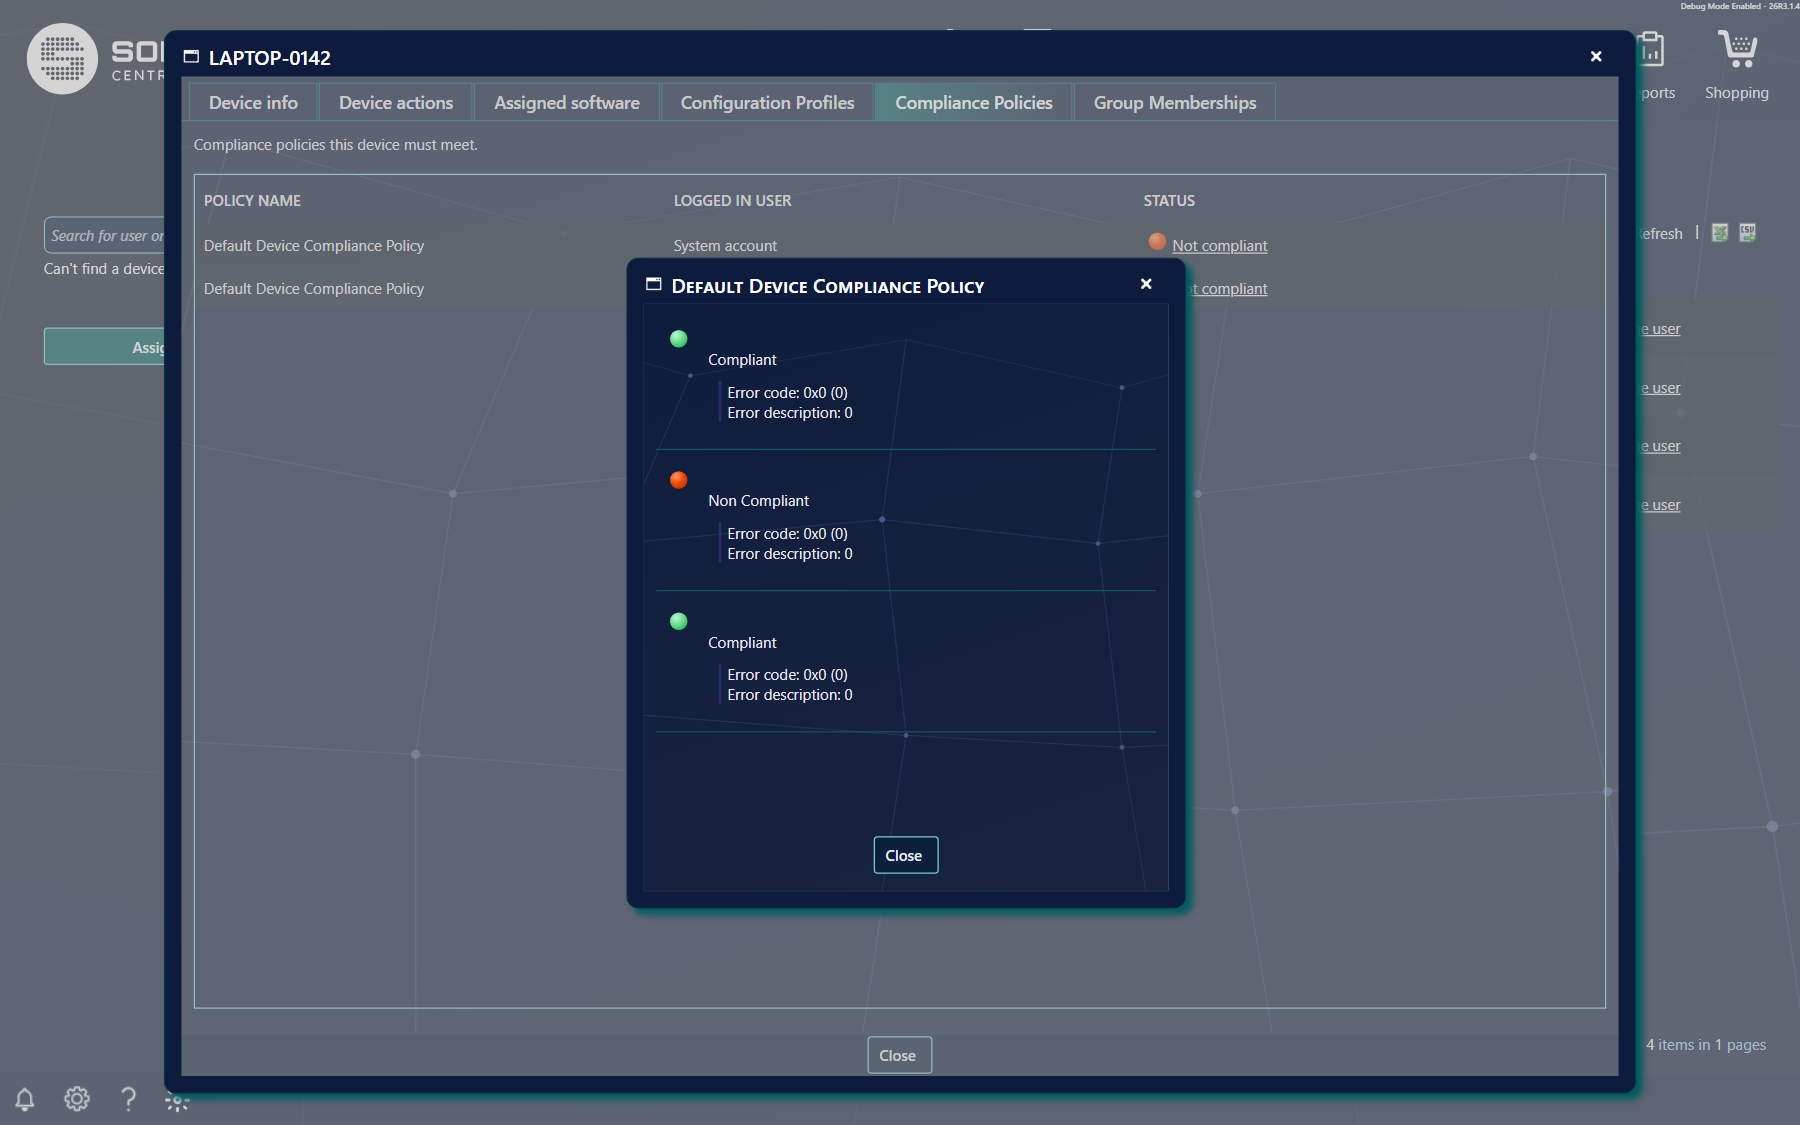
In the example below, you can see that the current device does not meet the minimum operating system version to be compliant.

9 Group memberships
The Group Memberships tab shows all Entra ID groups the device is a member of.
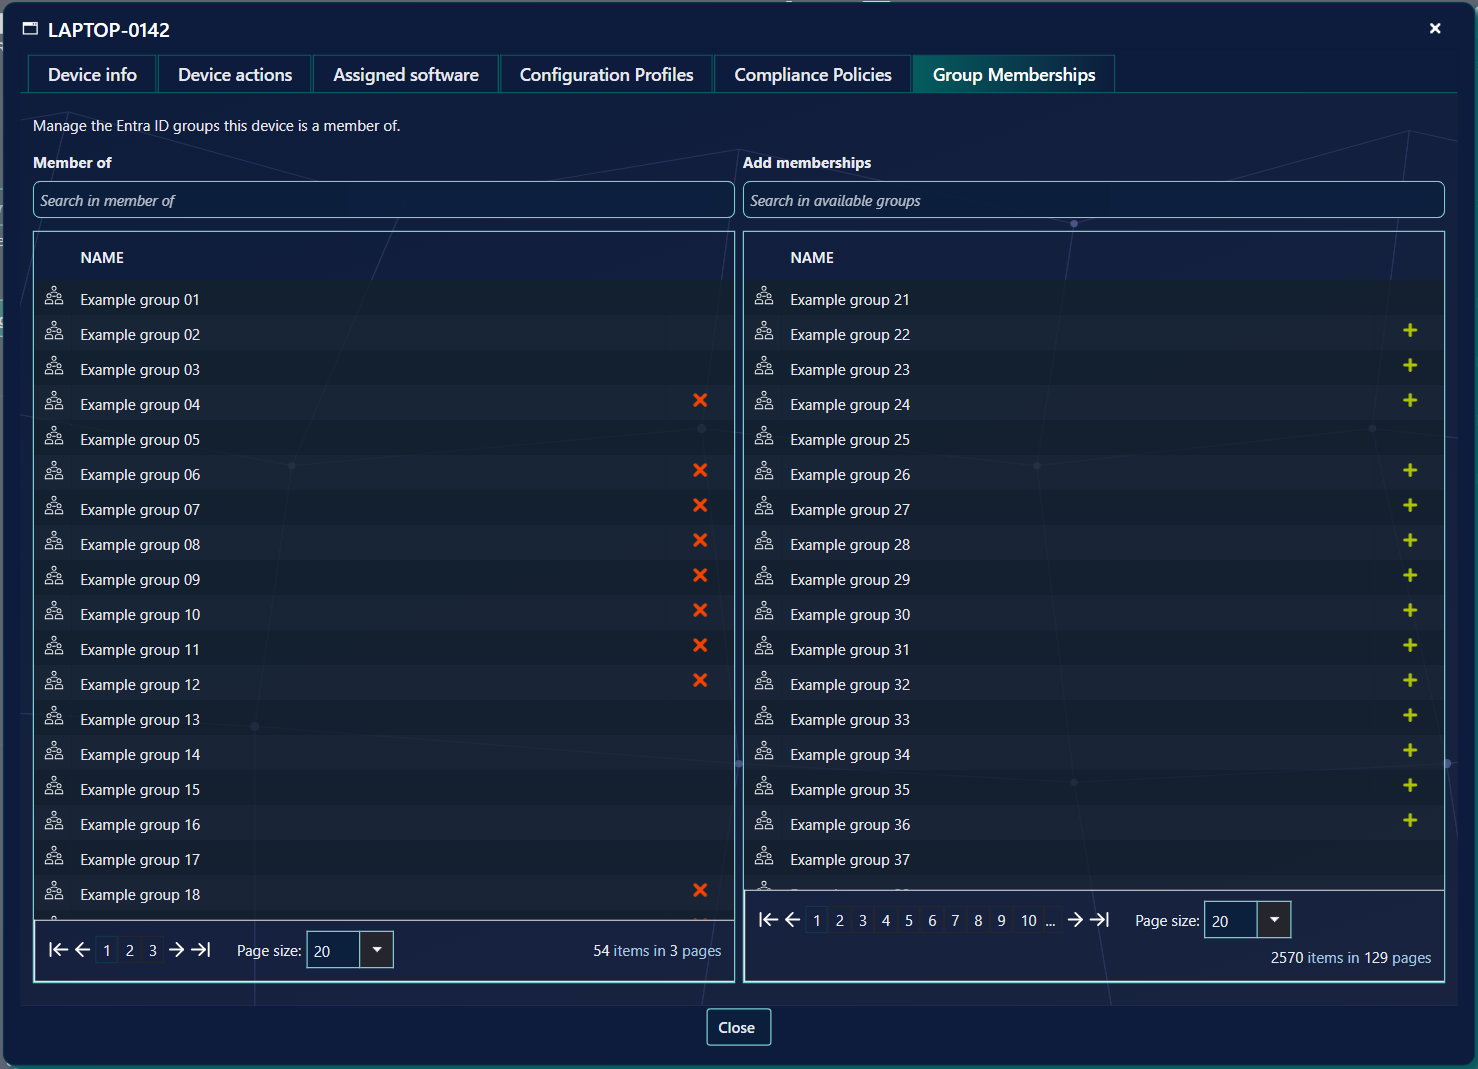
The device can not be removed from all groups. Whether a group can be removed depends on your permissions, the group type and the membership type. Only groups where the device is a direct member, with an assigned membership, can be removed from this tab. Groups that are synchronised from on-premises Active Directory cannot be removed here.
You can also add the device to new groups from the grid to the right. Click on the green plus button to add the device to a group. Dynamic groups cannot be changed by hand, so they have no plus button.
You will always be prompted before a device is added to or removed from a group.
10 Best practice
- Read the prompt before you confirm. Retire, Wipe, Delete, Remote Lock, ownership and primary user changes, and group changes all change the device or its groups in Intune. Wipe and Delete cannot be undone.
- Keep recovery keys and passwords private. The BitLocker keys and the local administrator password are shown on screen, and the Device Action Log can hold new passcodes and recovery keys. Only give the rights for these to the people who need them.
- Assign as available unless the app must be installed. The Assign the application as required. check box is ticked by default, and a required app is installed without any user interaction.
- Use Can’t find a device? only when a device is missing. Update cached manged devices reads the device list from Intune into the SoftwareCentral database, so it is not a routine refresh.
- Check the ownership before you change it. Changing a corporate device to personal stops Intune from collecting the phone number and app inventory, and the user is notified.
11 Troubleshooting
| Symptom | Cause | What to do |
|---|---|---|
| “Device to manage is null. Try restarting the browser.” in the device window | The device window opened without the device data. | Close the device window and open the device again from the list. If the message stays, restart the browser. |
| “Access denied.” in the installation details window | The window has no device to show. It reads the device from the session. | Close the device window and open the device again from the list, then click the status. |
| The Can’t find a device? link is not shown | Your security role does not have the right to refresh the device cache from Intune. | Ask your administrator for the right. |
| A device is missing from the list | The device has not yet been loaded into the SoftwareCentral database. | Wait for the next update. If you have the right, click Can’t find a device? and then Update cached manged devices. |
| The Group Memberships tab is not shown | Your security role may not see device group memberships, or the Active Directory module is not enabled. | Ask your administrator. |
| “Failed to install software. See the log for details.” | The application could not be assigned to the device. | Check the Log in SoftwareCentral for the reason, then try again. |
| “Failed to uninstall software. See the log for details.” | The application could not be removed from the device. | Check the Log in SoftwareCentral for the reason, then try again. |
| “A title is required.”, “A body is required.”, “The title must have a length of at most 50.” or “The body must have a length of at most 500.” in the notification prompt | The custom notification title or body is empty or too long. | Enter a title of up to 50 characters and a body of up to 500 characters. |
| “Message is required” or “Phone number is required” in the Enable Lost Mode prompt | A required field is empty. | Enter the message and the phone number. |
See also: Intune, Intune Dashboard,