1 How the connection works
SoftwareCentral signs in to Intune as an application, not as the person using it. Your operators therefore do not need an Intune role of their own — what each person may see and do is decided by the SoftwareCentral Security Roles and Package Security Groups.
| You need | Why |
|---|---|
| An Entra app registration per tenant | It is the identity SoftwareCentral uses. You create it in the tenant you want to manage and grant it the Microsoft Graph permissions on Intune Permissions. |
| A certificate (.pfx and .cer) | The .pfx, with its private key, stays on the SoftwareCentral server and signs the sign-in. The .cer, public key only, is uploaded to the app registration. The same certificate serves every tenant. Alternatively a Client Secret can be entered per tenant (see Best practice). |
| An administrator who can grant admin consent | All application permissions require admin consent in the tenant. |
| HTTPS on the SoftwareCentral site | See Configure HTTPS. Do this before you continue. |
| Intune licences for your users | You are responsible for licensing the users whose devices and apps are managed. |
2 Prepare a certificate
Open Settings › General Settings › Intune Configuration. The certificate rows are on this page; click Save Settings when you have changed them.
| Setting | What it does |
|---|---|
| Enable Intune integration | Switches the Intune parts of SoftwareCentral on. It is also switched on automatically the first time you save a tenant. |
| Enable Delta Sync | Makes the Intune synchronisation faster by fetching only what has changed since the last run. Recommended for large tenants. |
| Enable Intune Windows 365 Device Support | Lists Windows 365 Cloud PCs together with your other devices. Needs the Cloud PC permission, see Intune Permissions. |
| Generate self-signed certificate | Creates a new certificate pair. This replaces your current certificate, and the new .cer must be uploaded to every app registration that used the old one. |
| Path to certificate (.pfx) | Where the .pfx file is. A path that starts with ~ is resolved from the SoftwareCentral installation folder. |
| Certificate password | The password of the .pfx. It is stored encrypted. |
| Update certificate in cert store | The Update certificate button imports the .pfx into the server's Local Computer › Personal certificate store and remembers its thumbprint. Use it after you have replaced the file by hand. |
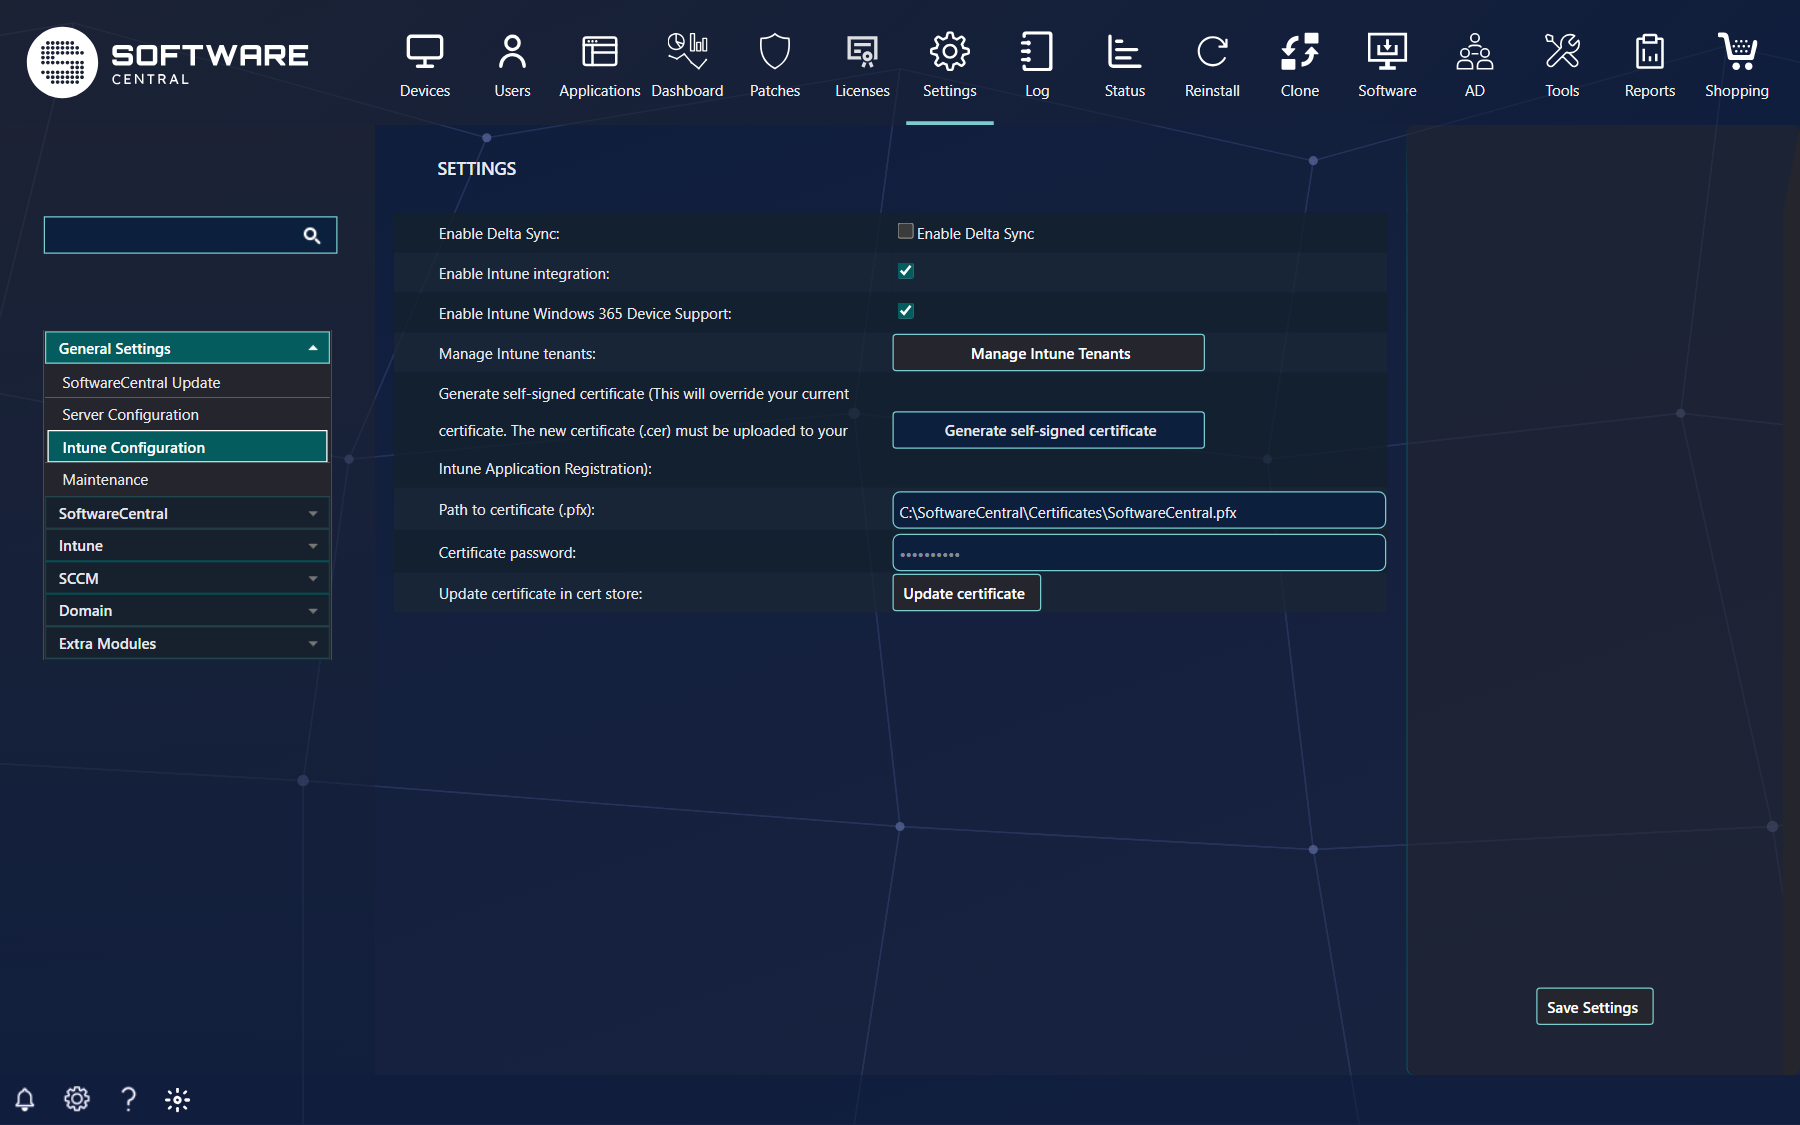
Generate a self-signed certificate
- Click Generate self-signed certificate.
- Enter a strong Certificate password and keep a record of it in your password manager.
- Click Download new certificate. Your browser downloads
UploadToIntune_SoftwareCentral.cer. This is the file you upload to Entra in the next section. - SoftwareCentral stores the matching private-key file as
Uploads\Certificates\StoreLocally_SoftwareCentral.pfxin the installation folder and fills in Path to certificate (.pfx) and Certificate password for you. - Click Save Settings.
Uploads\Certificates\UploadToIntune_SoftwareCentral.cer to the new app registration instead.
Use your own certificate
Get a certificate from your own certificate authority and prepare two files: a .pfx with the certificate and its private key, and a .cer with the certificate and the public key only. Put the .pfx where the SoftwareCentral application pool account can read it, enter its location and password in Path to certificate (.pfx) and Certificate password, click Save Settings, then click Update certificate. A message next to the button tells you if it worked, for example Certificate updated successfully., The certificate file does not exist. or The certificate password is empty.
3 Create the app registration
In the tenant you want to manage, open the Microsoft Entra admin centre and go to App registrations. Sign in with an account that may create applications and grant admin consent. The portal changes often; the names below are the ones to look for.
- Click New registration and give it a clear name, for example SoftwareCentral – Contoso.
- Choose the Supported account types. Choose multitenant only if you really need one registration across several tenants; a registration per tenant is simpler to reason about.
- You do not need a Redirect URI for the Intune connection. (Signing users in to the portal with Entra ID is a separate setup, see OpenID authentication.)
- Click Register. On the Overview page copy the Application (client) ID and the Directory (tenant) ID. You enter both in SoftwareCentral shortly.
- Go to Certificates & secrets, open the Certificates tab, click Upload certificate and choose the .cer file from section 2.
- Go to API permissions, click Add a permission, choose Microsoft Graph, and add the Delegated and Application permissions listed on Intune Permissions. Add only the ones you need.
- Click Grant admin consent for your organisation and confirm. Do this again every time you add a permission.
The steps in the portal
The pictures follow the steps above. Wording in the portal changes from time to time; the concepts stay the same.


Shortcut: the Update permissions button
Instead of adding the permissions one by one, you can let SoftwareCentral write its permission list into the app
registration: in Manage Intune Tenants (next section) click Update permissions. This needs the
app registration to already hold the Application.ReadWrite.All application permission with consent
— so add and consent that single permission by hand first. SoftwareCentral then adds whatever is missing
from its list and tells you whether anything changed.
Update permissions never grants consent. When something was added, the message links to the Azure portal page of the registration, and an administrator must still grant admin consent there. The list it writes is the standard set; check the manifest on Intune Permissions for optional permissions such as scripts or Windows 365, which you add by name.
4 Service account (optional)
Some Intune and Entra data is only available to a signed-in user, not to an application: BitLocker recovery keys and resetting user passwords. If you do not use those features, leave the service account out.
The account must be a member of one of these Entra roles (listed from least to most privileged):
- Security reader
- Global reader
- Helpdesk administrator
- Security administrator
- Cloud device administrator
- Intune service administrator
- Global administrator (not recommended in production)
5 Add the tenant in SoftwareCentral
Open Settings › General Settings › Intune Configuration and click Manage Intune Tenants. A window opens. On the left you pick a tenant under Select Intune tenant or click Add new tenant; the fields for the selected tenant are on the right. The very first time, the window opens ready to add a tenant.
| Field | What to enter |
|---|---|
| Enable tenant | Ticked means users can reach the tenant. If you untick it, users lose access to its resources; what SoftwareCentral has already stored about it is kept. |
| Tenant friendly name | A name your operators will recognise. They see it when they switch between tenants. It must be unique. |
| Tenant ID | The Directory (tenant) ID you copied from the app registration. |
| Client ID | The Application (client) ID of the app registration. |
| Client Secret (optional) | Leave empty to sign in with the certificate (recommended). If you enter a secret, SoftwareCentral uses it for this tenant instead of the certificate. |
| Administrative unit (optional) | Only if your organisation does not let applications create groups in the directory root. Enter the ID of an administrative unit and SoftwareCentral creates every group for this tenant inside it. The app registration then also needs AdministrativeUnit.Read.All and the Groups Administrator or User Administrator role on that unit, see Intune Permissions. Leave it empty otherwise. |
| Service account username | Only if you set up a service account in section 4. |
| Service account password | Type a password only when you want to change it; an empty box keeps the saved one. It is stored encrypted. |

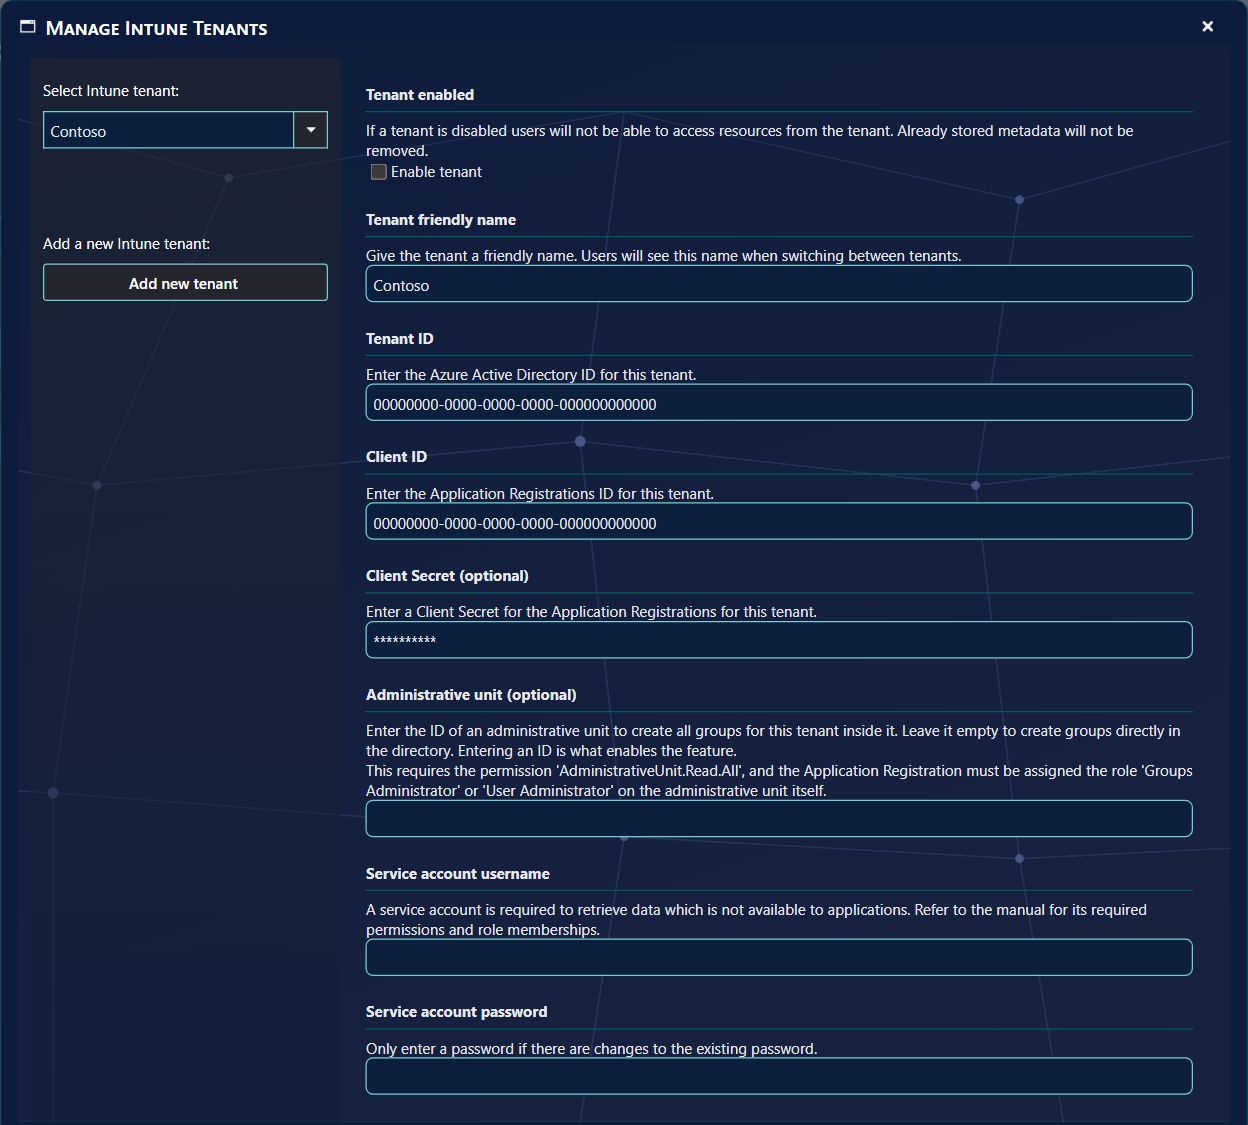

The buttons at the bottom of the window:
| Button | What it does |
|---|---|
| Save changes | Saves the tenant. Save before you select another tenant or close the window. SoftwareCentral refuses a tenant without a name, Tenant ID or Client ID, and one whose name or ID already exists. |
| Test connection | Tries to sign in with what is on screen and reports the result, see the next section. You can test before you save. |
| Update permissions | Writes SoftwareCentral's permission list into the app registration, see section 3. |
| Close | Closes the window. |
When the tenant is saved, go to Settings › General Settings › Maintenance, click Clear Cache and then Restart SoftwareCentral. The restart disconnects all users and ends running operations, so choose a quiet moment.
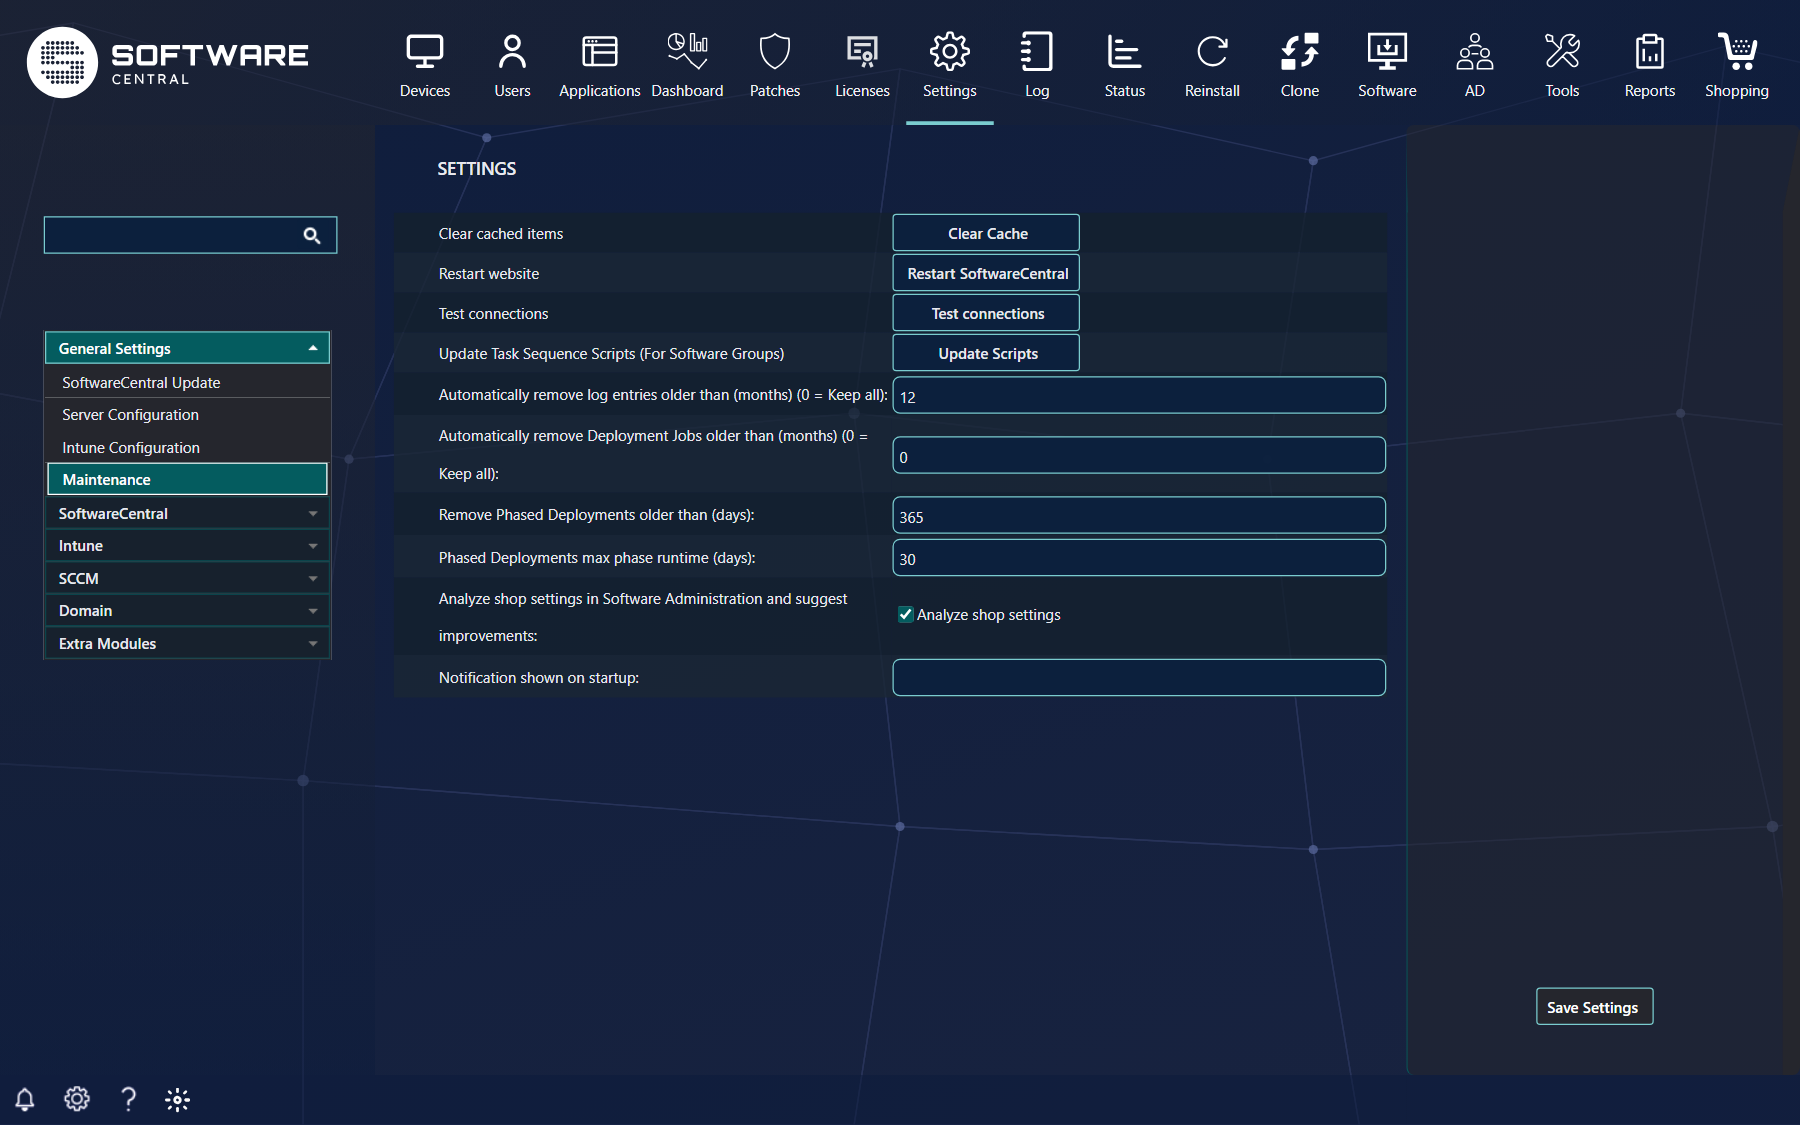
6 Test the connection
Click Test connection in the tenant window. The result appears below the buttons.
| You see | What it means / what to do |
|---|---|
| Connection was successfully established. and nothing else | SoftwareCentral signed in and found the core permissions consented. You are done. |
The following recommended permissions are missing: followed by a list such as Group.ReadWrite.All (Application) | The sign-in works but the list names permissions that are not consented. Add and consent them on the app registration, wait a few minutes, test again. If you chose not to grant one on purpose, check on Intune Permissions what you lose. |
| Failed to get access token. and a message from Microsoft | The sign-in itself failed. Read the message and see Troubleshooting. |
| A tenant name is required, Tenant ID is required, Client ID is required | A field is empty. Fill it in. |
| A tenant with this name already exists / This tenant already exists | The friendly name or the tenant ID is already in use by another entry. Select that entry instead of adding a new one. |

7 Good to know
| Topic | What happens |
|---|---|
| Data is cached | SoftwareCentral keeps a copy of Intune data so pages open instantly. The full refresh runs about once an hour; with Enable Delta Sync on, changes are picked up within minutes. A resource you are missing usually appears after the next refresh. While testing, restart the service in the Service Manager to trigger a refresh. |
| Several tenants | Each tenant has its own app registration, Client ID and optional secret, and one shared certificate. Operators switch tenant by its friendly name. |
| Who sees which tenant | Assign tenants to your Security Roles. Intune applications are delegated with Package Security Groups. |
| Disabling a tenant | Untick Enable tenant and save. Nothing is deleted, so you can switch it back on later. |
| Old settings | The earlier user-sign-in method and its redirect-URI settings are no longer used. |
8 Best practice
Security
- Prefer the certificate to a client secret. A secret is a password stored in the SoftwareCentral database; the certificate's private key stays in the server's certificate store.
- Protect the .pfx and its password. Keep a copy of both in a vault you trust, restrict the folder to the application pool account and administrators, and never e-mail them.
- Plan certificate renewal. A self-signed certificate expires. Before it does, renew it (or generate a new one), upload the new .cer to every app registration, then click Update certificate — otherwise every tenant stops at once.
- Grant the least you need. Intune Permissions explains for each permission what you lose by withholding it, and gives a read-only alternative where Microsoft has one. The permissions you decline cannot be abused.
- One registration per tenant and environment. Do not share a registration between test and production, or between customers.
- Keep the service account out of daily use. Cloud-only, lowest role, long random password, no mailbox, and alert on its sign-ins in Entra.
- Run on HTTPS only and let operators reach Intune data only through Security Roles.
Tenant selection
- Give each tenant a friendly name that says which tenant it is (customer or environment). Operators pick by name.
- Add a tenant to a Security Role only when that role should really manage it; a tenant that no role has is invisible to operators.
- Add the production tenant last, after a test tenant has proved the setup and the permission set.
Testing
- Click Test connection after every change to the tenant or to the app registration.
- Open a device in Intune and a group in Entra ID Groups to see real data arrive.
- Run Test permissions on the device dashboard to confirm the optional permissions.
- Look in the log for entries about the Intune connection if anything is off.
9 Troubleshooting
| Symptom | Likely cause and fix |
|---|---|
| Microsoft message mentions AADSTS700027 or an invalid client assertion / signature | The .cer you uploaded does not match the .pfx SoftwareCentral uses. Upload the .cer that belongs to the current .pfx, or click Update certificate if you replaced the .pfx. |
| AADSTS7000215, invalid client secret | The Client Secret is wrong or expired. Enter a new one, or clear the field to use the certificate. |
| AADSTS700016 or AADSTS90002, application or tenant not found | Client ID or Tenant ID is mistyped, or the registration is in a different tenant. |
| Failed to get access token and the certificate message from Update certificate | Check that the file exists, the password is right, and the application pool account can read the folder. |
| Sign-in works, but a feature says forbidden (403) | A permission is missing or not consented. Compare with Intune Permissions, grant admin consent, wait a few minutes. |
Update permissions says the app registration needs Application.ReadWrite.All | Add and consent that one permission by hand first, or add the permissions manually. |
| Everything worked yesterday, now all tenants fail | The certificate has probably expired, or someone generated a new one. Upload the matching .cer everywhere. |
| A resource is missing in SoftwareCentral but exists in Intune | Wait for the next refresh (see section 7), or clear the cache and restart under Maintenance. |
Related: Intune Permissions · Security Roles · Service Manager · Maintenance