1 Open the Security Roles interface
Open Settings in the top menu and choose Security Roles. The interface lists every role that can use SoftwareCentral.
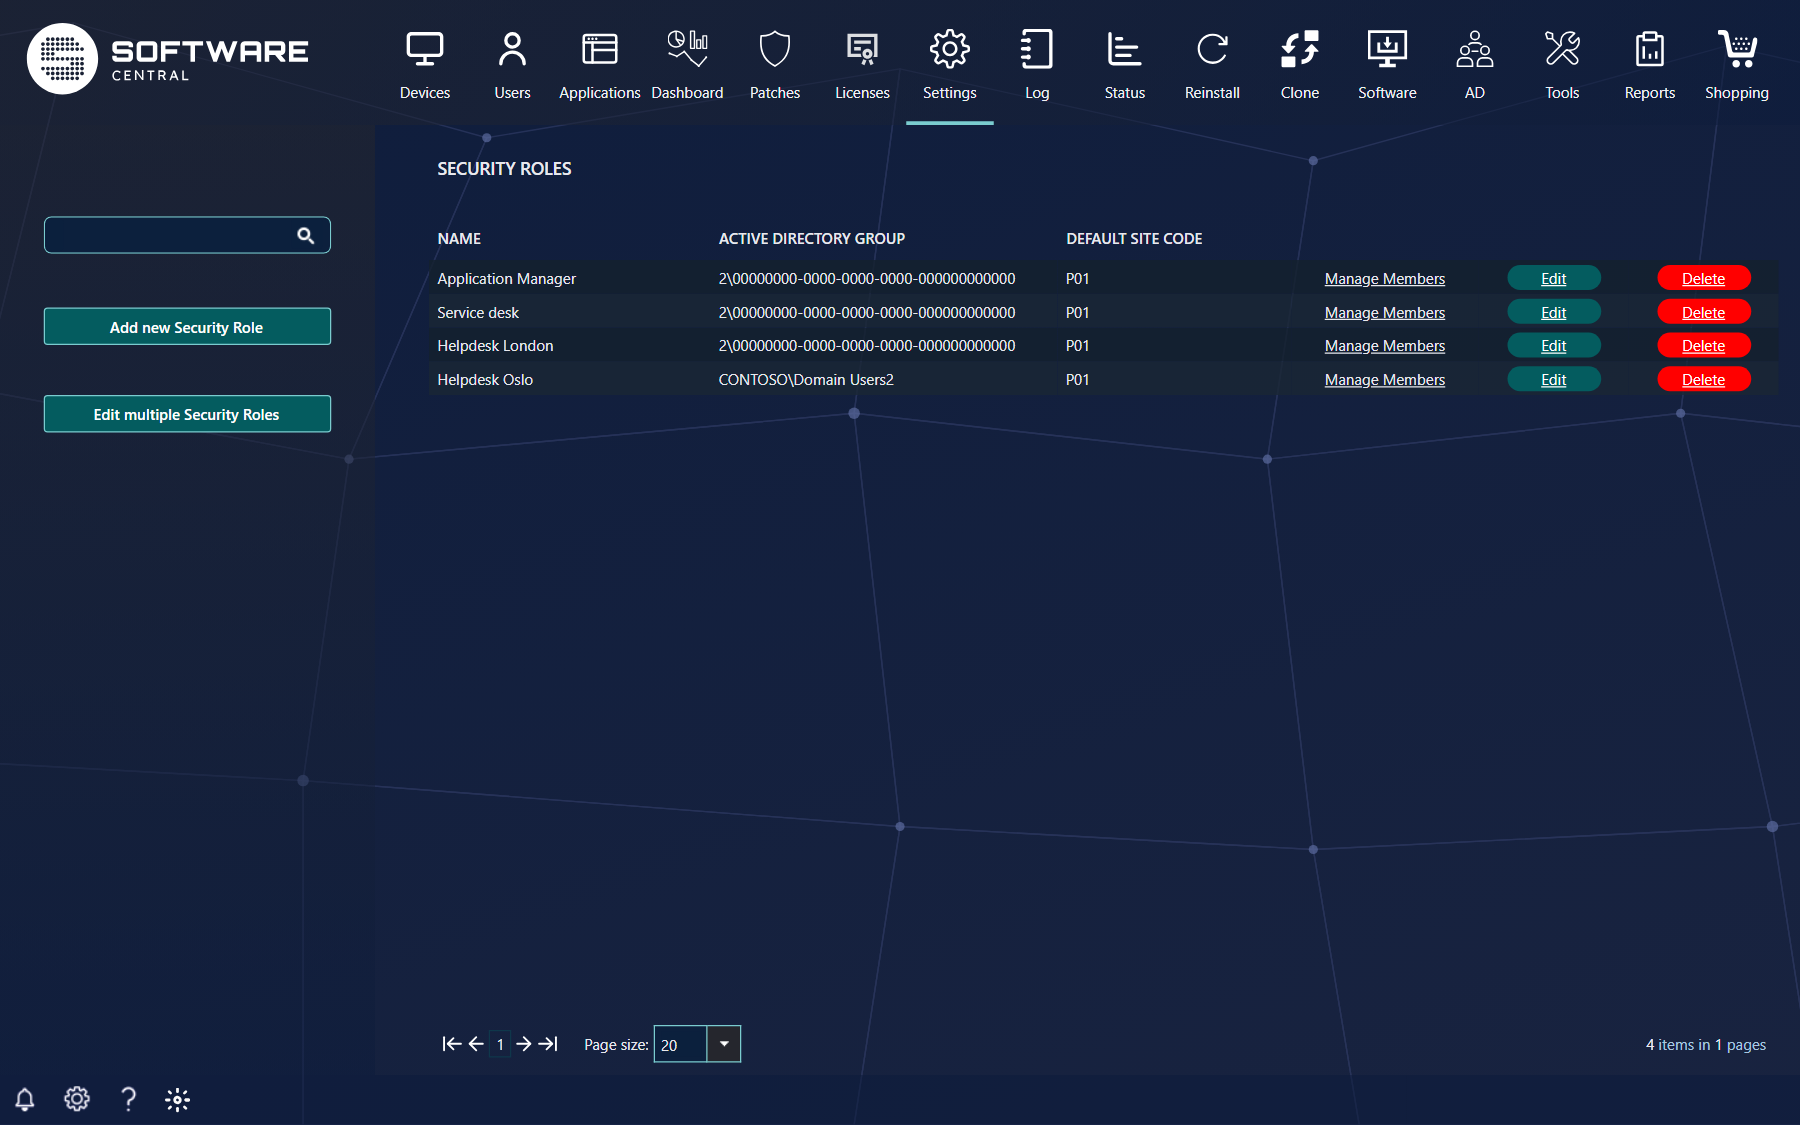
A role is a set of limits. A person gets the role through the group the role is linked to. Your IT department decides which groups exist; see Security Roles for what a role can limit.
2 The list of roles
The left side has the search box and the buttons; the table on the right lists the roles.
| Item | What it does |
|---|---|
| Search box | Type a value and press Enter to show every role that contains it. The tip reads Hit enter to search for all items containing the search values. |
| Add new Security Role | Opens the role wizard. It is shown only to roles that may create security roles. |
| Edit multiple Security Roles | Edits several roles at once. It is not shown in Intune-only or Application Manager Only installations, or without the right to use it. |
| Export Security Roles | Opens the export window. It is shown only with the right to export. See Export security roles. |
| Name | The role name. Click it, or Edit, to open the role. |
| Active directory group | The group whose members get the role. In an installation that reads members from Microsoft Entra ID, the column shows the tenant and group IDs. The column is not shown in Intune-only installations. |
| Default site code | The site the role starts in. Not shown in Intune-only installations. |
| Manage Members | Opens the window to add or remove members of the role's group. Not shown when members come from Microsoft Entra ID and the Active Directory Module is not enabled. |
| Edit and Delete | Open the role for editing, or delete it. Each column is shown only with its right. |
3 Create a security role
Click Add new Security Role in the left menu. The wizard opens on Role Details. Only this first step has required fields; the other steps limit what the role can use, and you can leave them as they are.
The wizard has up to seven steps. Which steps you see depends on what your installation has configured:
| Step | Shown when |
|---|---|
| 1 Role Details | Always. |
| 2 SCCM Security | Not in Intune-only installations. |
| 3 Intune Security | Only when SoftwareCentral is connected to your Intune tenant. |
| 4 SoftwareCentral Security 1 | Always. |
| 5 SoftwareCentral Security 2 | Not in Intune-only or Application Manager Only installations. |
| 6 Reporting | Only when reports are configured. See SCCM Reporting Setup. |
| 7 AD Security | Not in Microsoft Entra ID-only or Application Manager Only installations. |
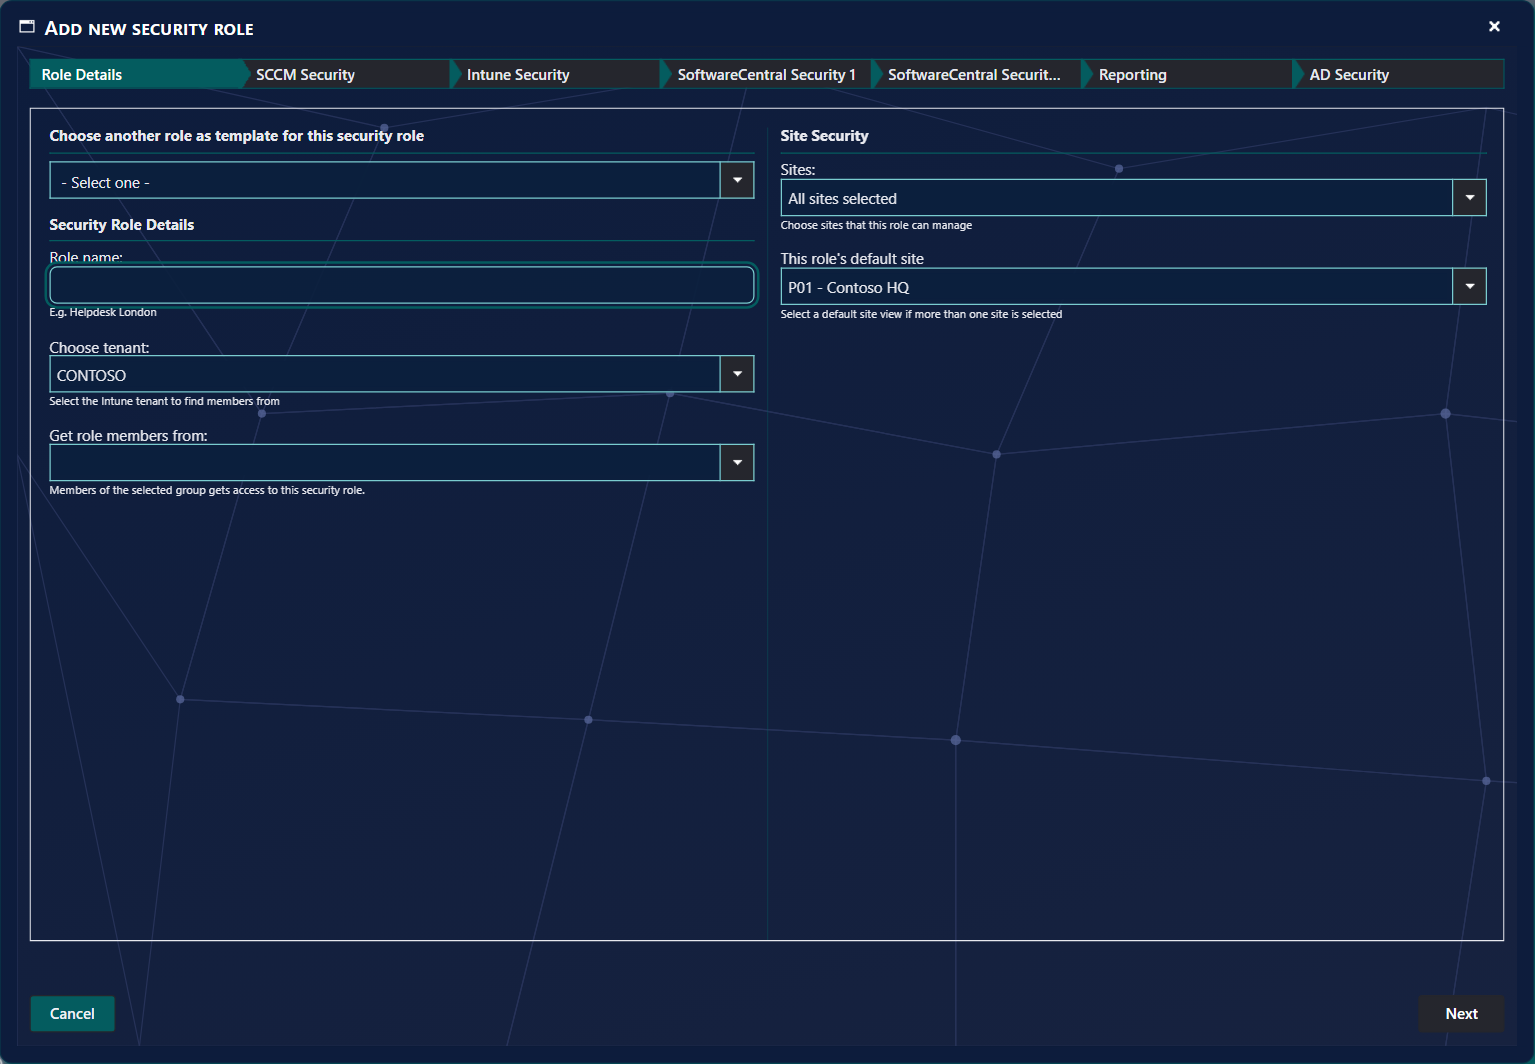
Step 1 Role Details
In this step all the details of the role are entered. Complete it as follows.
1) Type a descriptive Role name, for example Helpdesk London.
2) Choose where the members come from. In an installation with Active Directory groups, choose the domain under Choose domain, then the AD group under Get role members from. In an installation that reads members from Microsoft Entra ID, choose the Intune tenant under Choose tenant, then the group under Get role members from.
3) The members of the selected group get access to this security role.
4) Choose the sites the members of the security role are allowed to see and operate in. If there is only one site, it is selected automatically.
5) Choose a default site view if more than one site is selected. This is the site that is selected when users sign in.
6) Click Next.
Step 2 SCCM Security
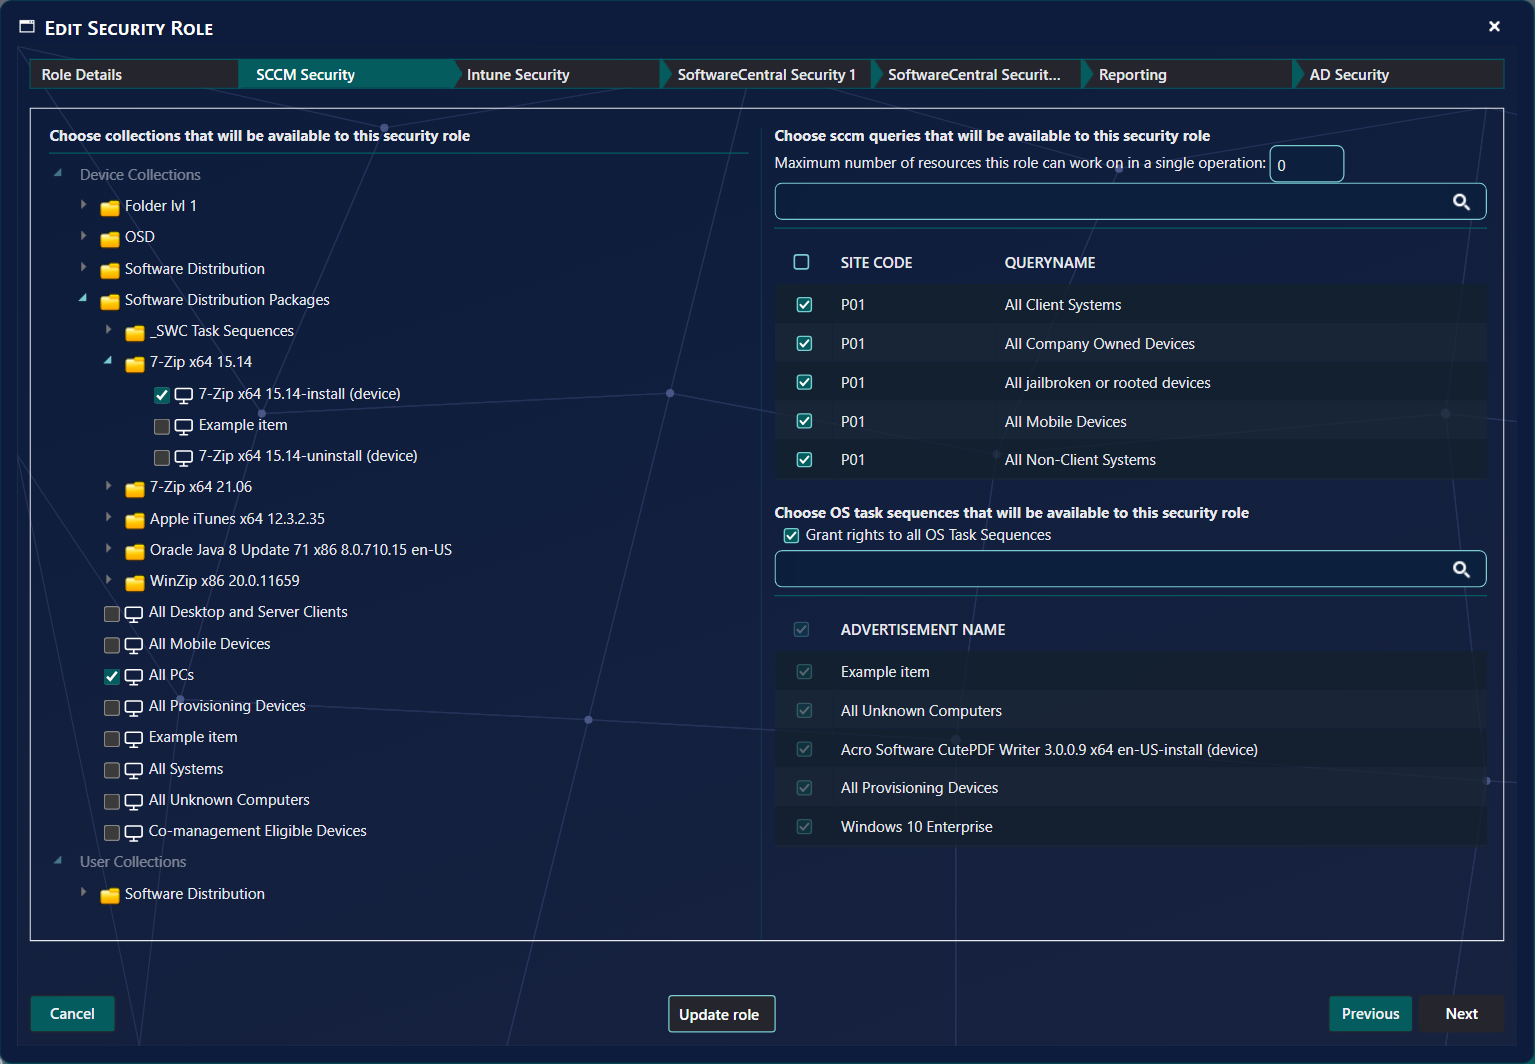
This step sets the collections, the SCCM queries, the maximum number of resources and the OS task sequences for the role.
1) Choose collections that will be available to this security role. The collections limit which users and devices the role can operate on. A security role can only see users and devices that are members of the selected collections.
2) Choose sccm queries that will be available to this security role. Select the SCCM queries the role is allowed to use. Queries are listed for each site the role can operate on.
a) Maximum number of resources this role can work on in a single operation. Set the largest number of devices or users the role can work on in one operation. This removes the risk of a user making a mistake on too many devices or users at the same time. The value applies to the operations that work on several resources at once, for example Delete Multiple or Reinstall Multiple. Enter a whole number; 0 means there is no restriction.
3) Choose OS task sequences that will be available to this security role. Select the OS task sequences this role is allowed to use when importing and reinstalling computers.
Step 3 Intune Security
This step is only shown when SoftwareCentral is connected to your Intune tenant. It sets the Intune tenants and groups the role may use.
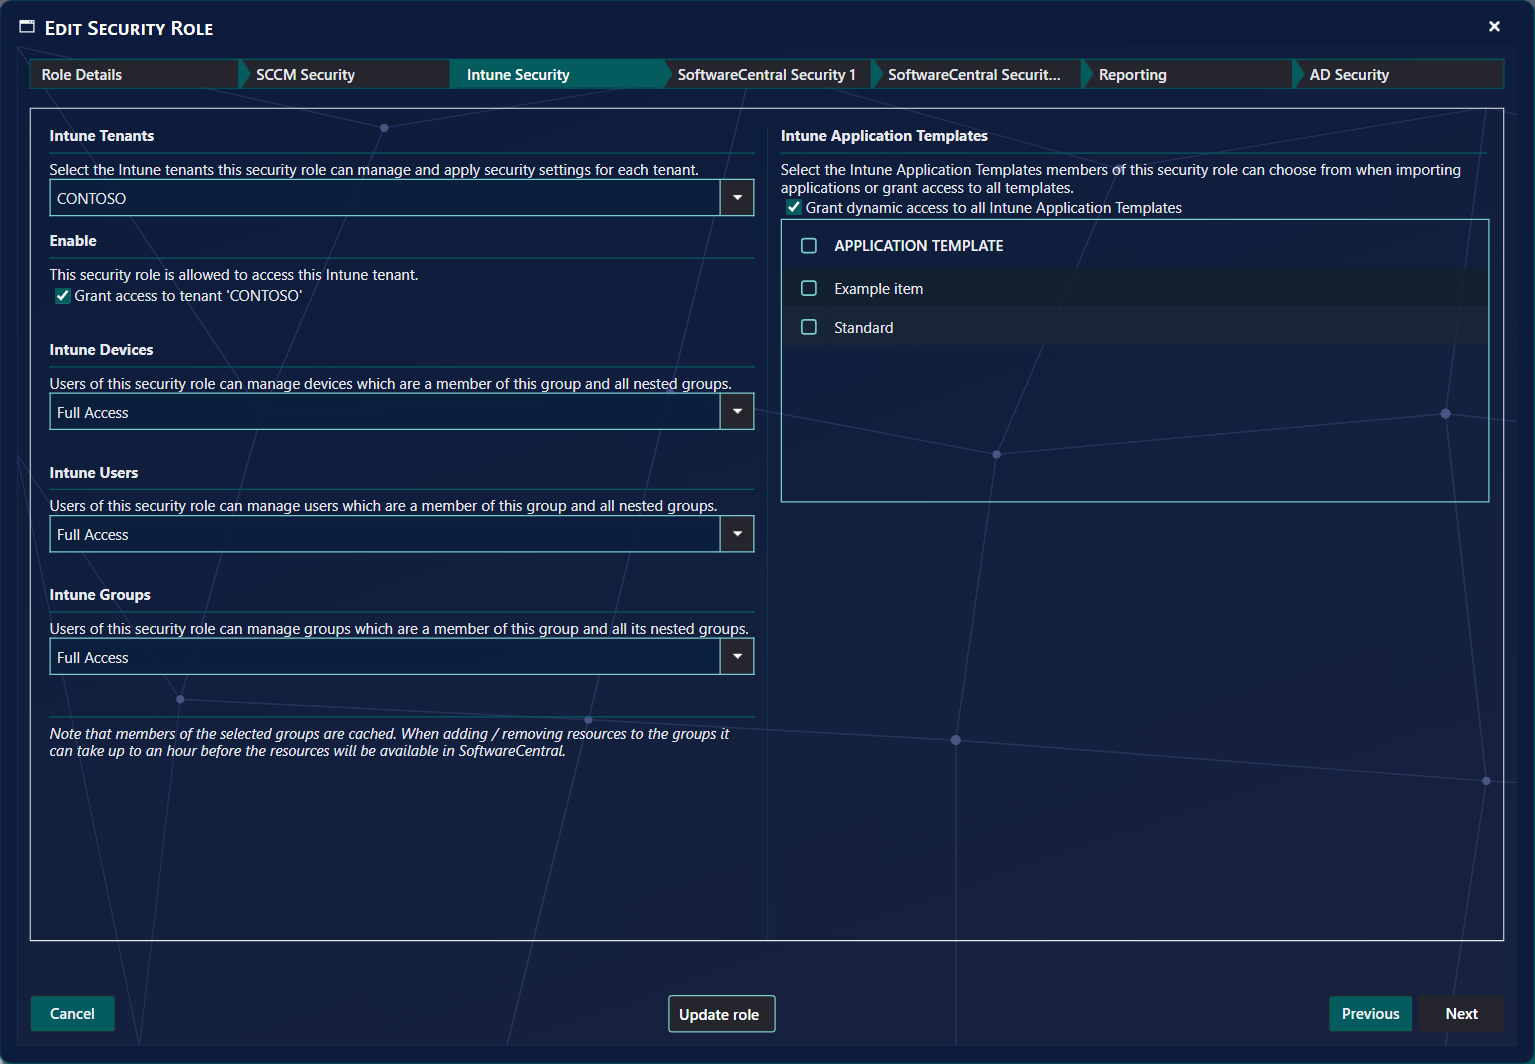
1) Choose the Intune tenants this security role can manage, and apply the security settings for each tenant.
2) Tick Grant access to tenant to allow the role to access the tenant.
3) Select a device group under Intune Devices for users to see and manage devices. Users of this security role can manage devices that are members of this group and all nested groups. Full Access gives access to all devices.
4) Select a user group under Intune Users for users to see and manage users. The same rule applies to nested groups.
5) Select a group under Intune Groups for users to see and manage groups.
6) Select the Intune Application Templates the members of this security role can choose from when importing applications, or tick Grant dynamic access to all Intune Application Templates to give access to all of them.
The available applications are controlled with Package Security Groups under SoftwareCentral Security 1.
Step 4 SoftwareCentral Security 1
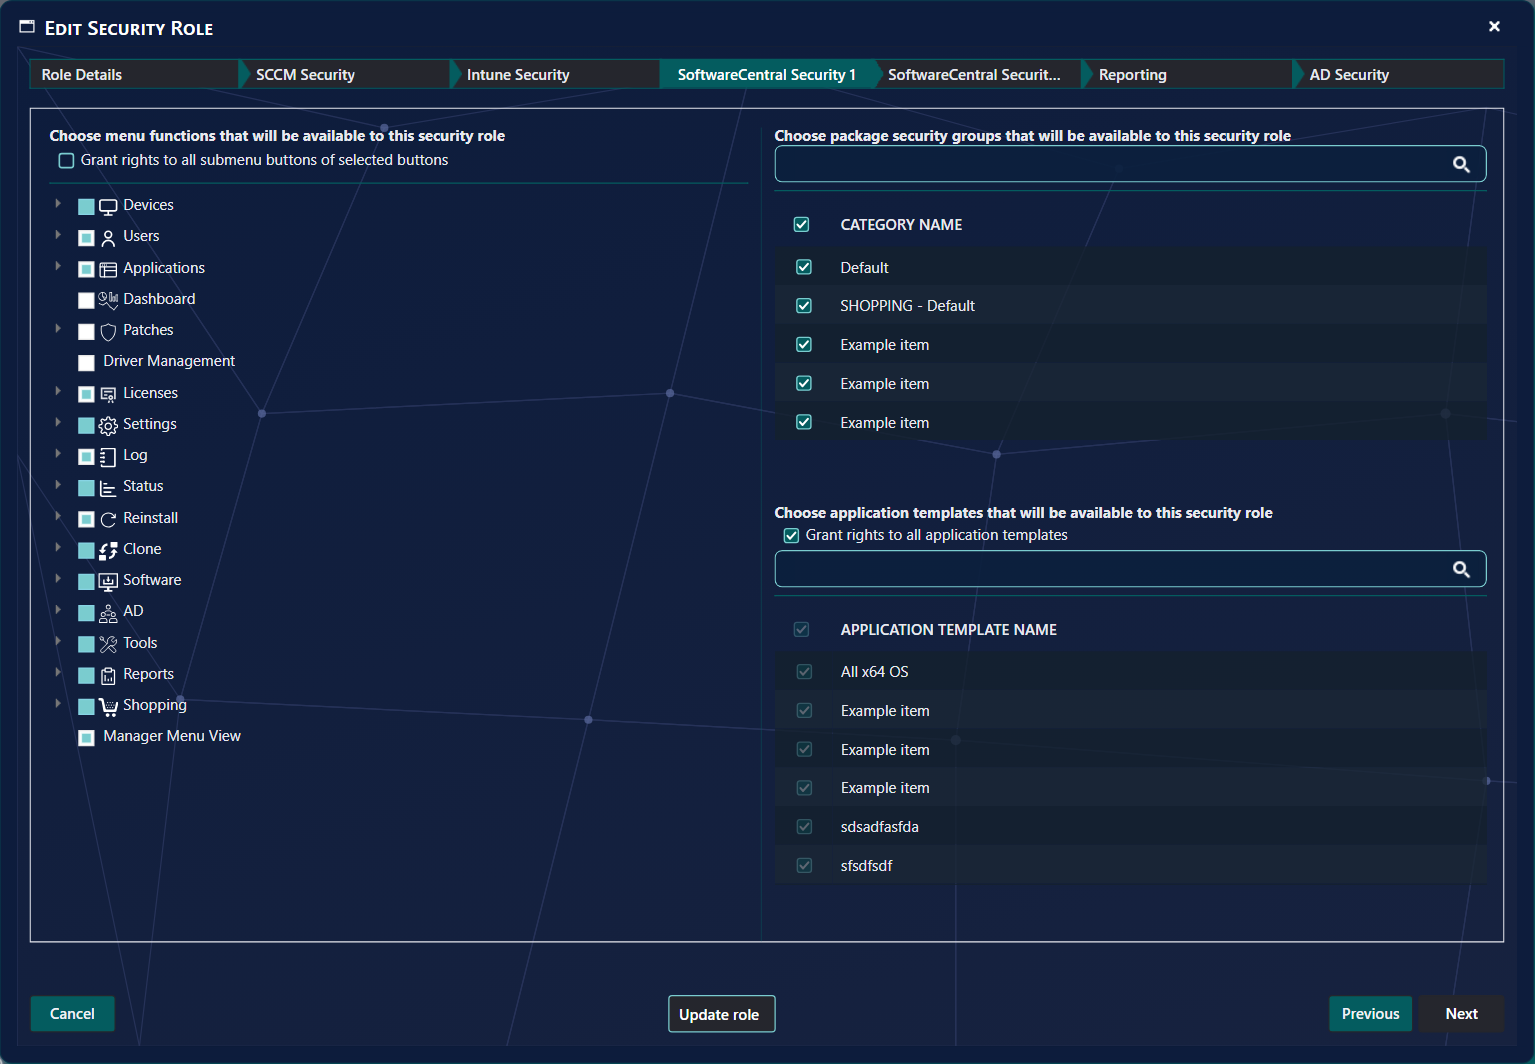
This step sets which menu buttons, package security groups and application templates the role can use.
1) Choose menu functions that will be available to this security role. Tick the main menu buttons the role can use. Each main menu button has submenu buttons, and under them the interface buttons, so a role can be limited to part of an interface. Expand a button to tick its submenu buttons.
a) Grant rights to all submenu buttons of selected buttons. Tick this if the role needs full access to all submenu buttons and all interface buttons of the selected main menu buttons. SoftwareCentral regularly adds new interfaces and features, and a role does not see them until it is updated. With this option the role gets them without an update.
2) Choose package security groups that will be available to this security role. Select the package security groups this role may see. Assign Packages to Security Groups explains how packages, applications and software groups are limited with them.
3) Choose application templates that will be available to this security role. Select the Application Templates this role can use. Tick Grant rights to all application templates to give access to all templates, including those added later.
Step 5 SoftwareCentral Security 2
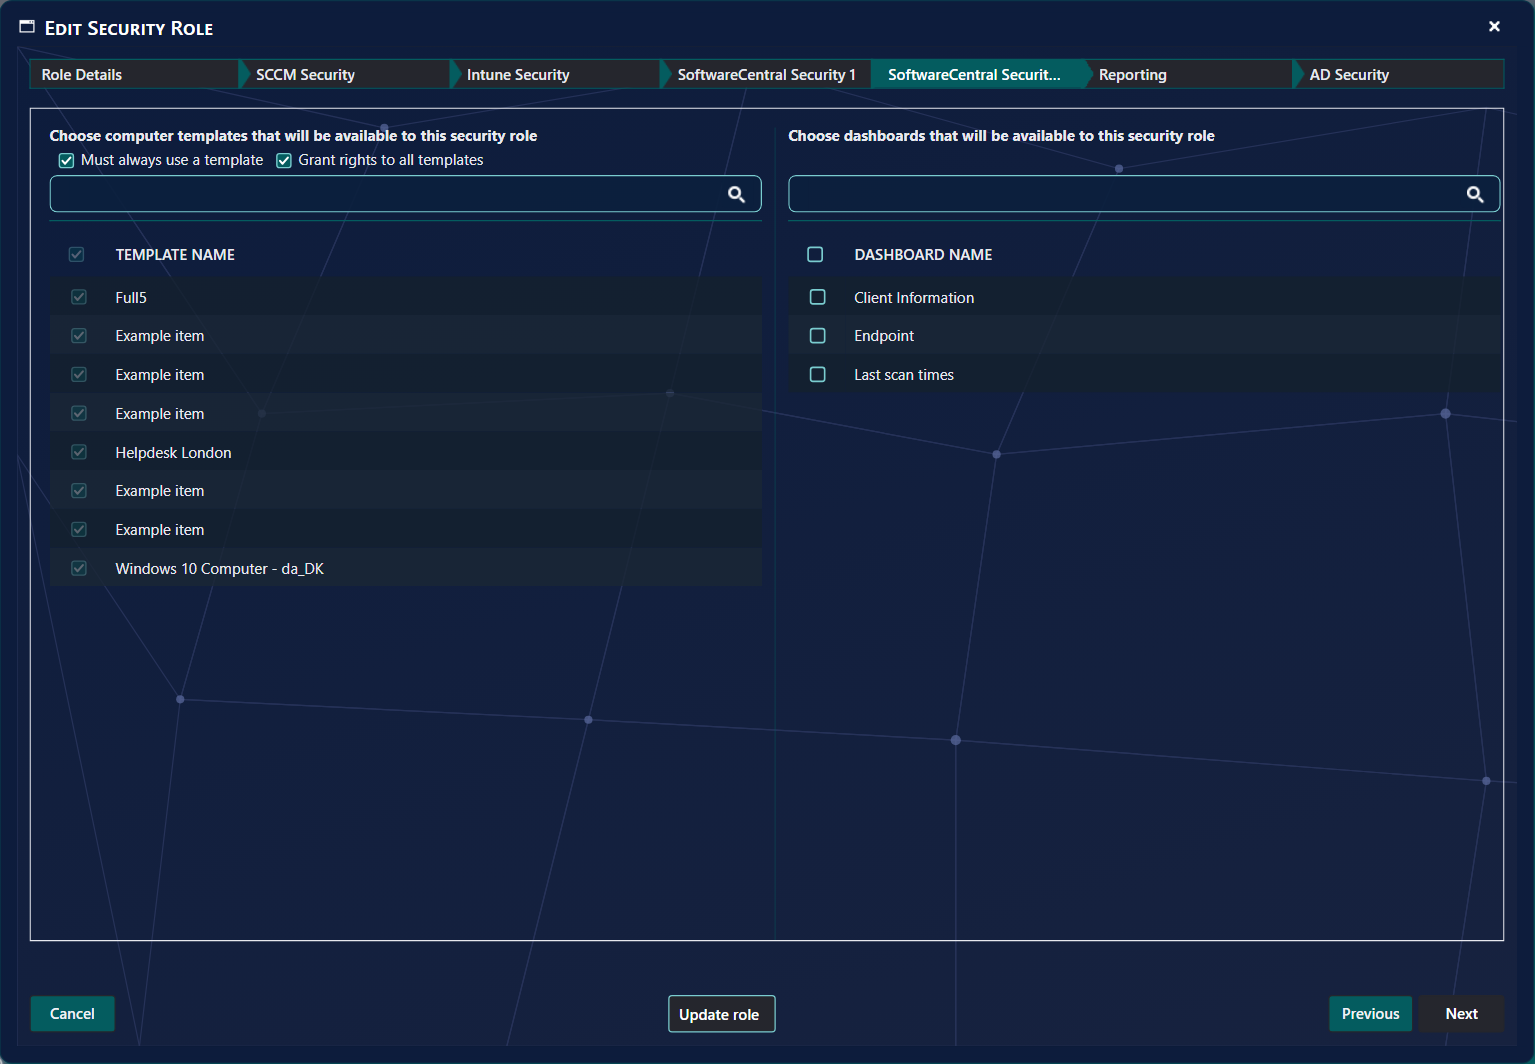
This step sets the computer templates and dashboards the role can use.
1) Computer templates. Select the computer templates that will be available to this security role. Two extra settings:
a) Must always use a template. The role must use a template when importing a computer.
b) Grant rights to all templates. The role gets access to all templates, at all times.
2) Dashboards. Choose the dashboards that will be available from the Dashboard interface.
Application templates are set in step 4, SoftwareCentral Security 1.
Step 6 Reporting
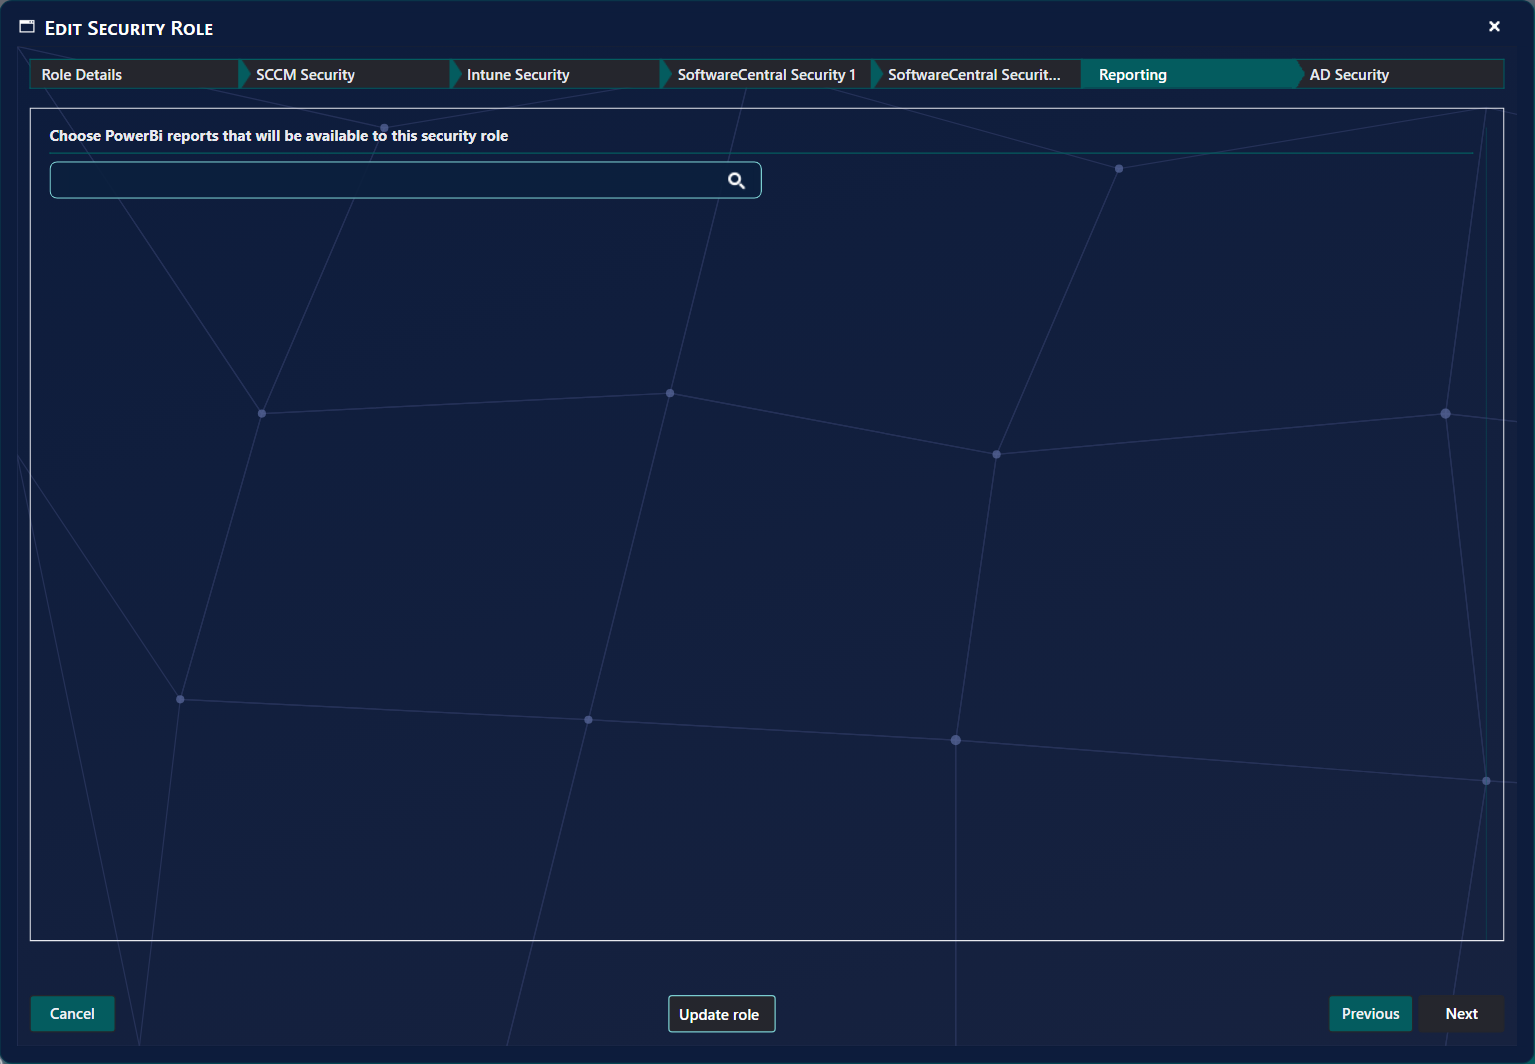
This step sets the reports the role can see in the SCCM reports interface.
1) Choose PowerBi reports that will be available to this security role. Search for a report and tick it in the tree. The Power BI part is not shown when Power BI is disabled.
2) Choose SCCM reports that will be available to this security role. Tick the reports in the tree, or tick Grant rights to all SCCM Reports.
Step 7 AD Security
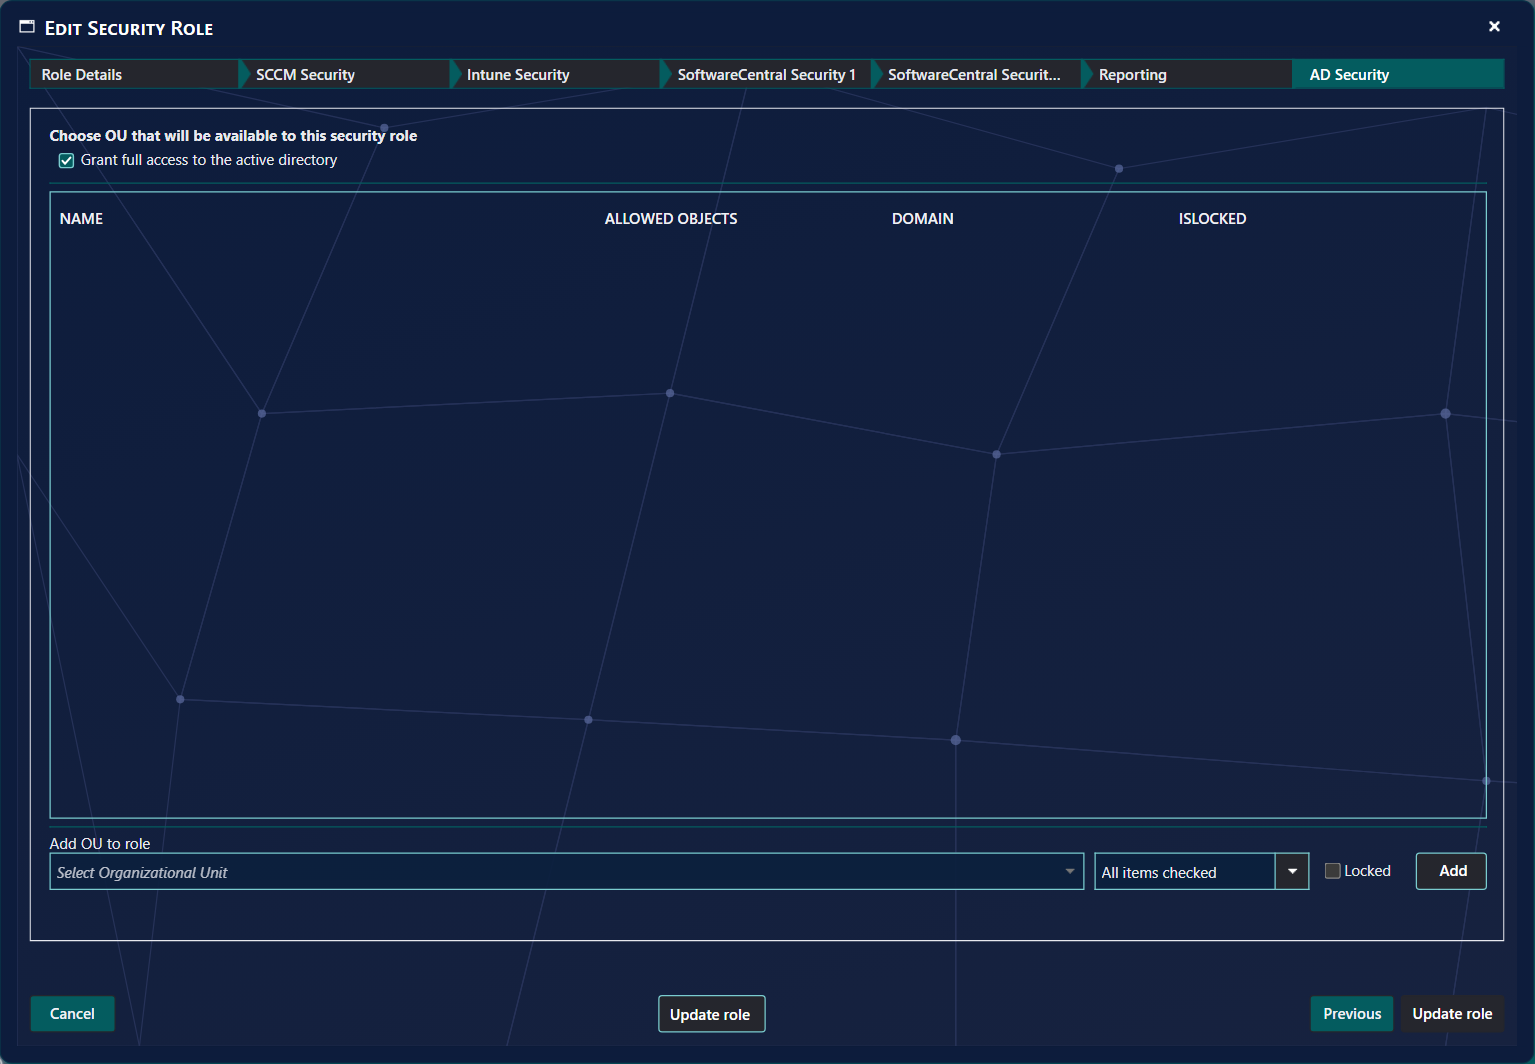
By default all roles have access to all domains. This can be limited by adding organizational units.
1) Clear Grant full access to the active directory to limit the role.
2) Choose an organizational unit in Select Organizational Unit.
3) Use the object type list to determine which objects the user is allowed to manage: Users, Groups and Computers. All three are ticked by default.
4) Tick Locked to lock the organizational unit, so that when a device is imported the sub OUs cannot be selected.
5) Click Add. Use the Delete link in a row to remove it.
An organizational unit limits which OUs appear in the OU drop-down when importing computers. It also limits which objects the Active Directory module can access for the role.
Finish
On the last step, click Create role to create the role. The window closes when the role has been created.
4 Edit a security role
In the list, click Edit on the role, or its name. The same wizard opens with the current settings. The Update role button stays at the bottom of every step; click it to save your changes.
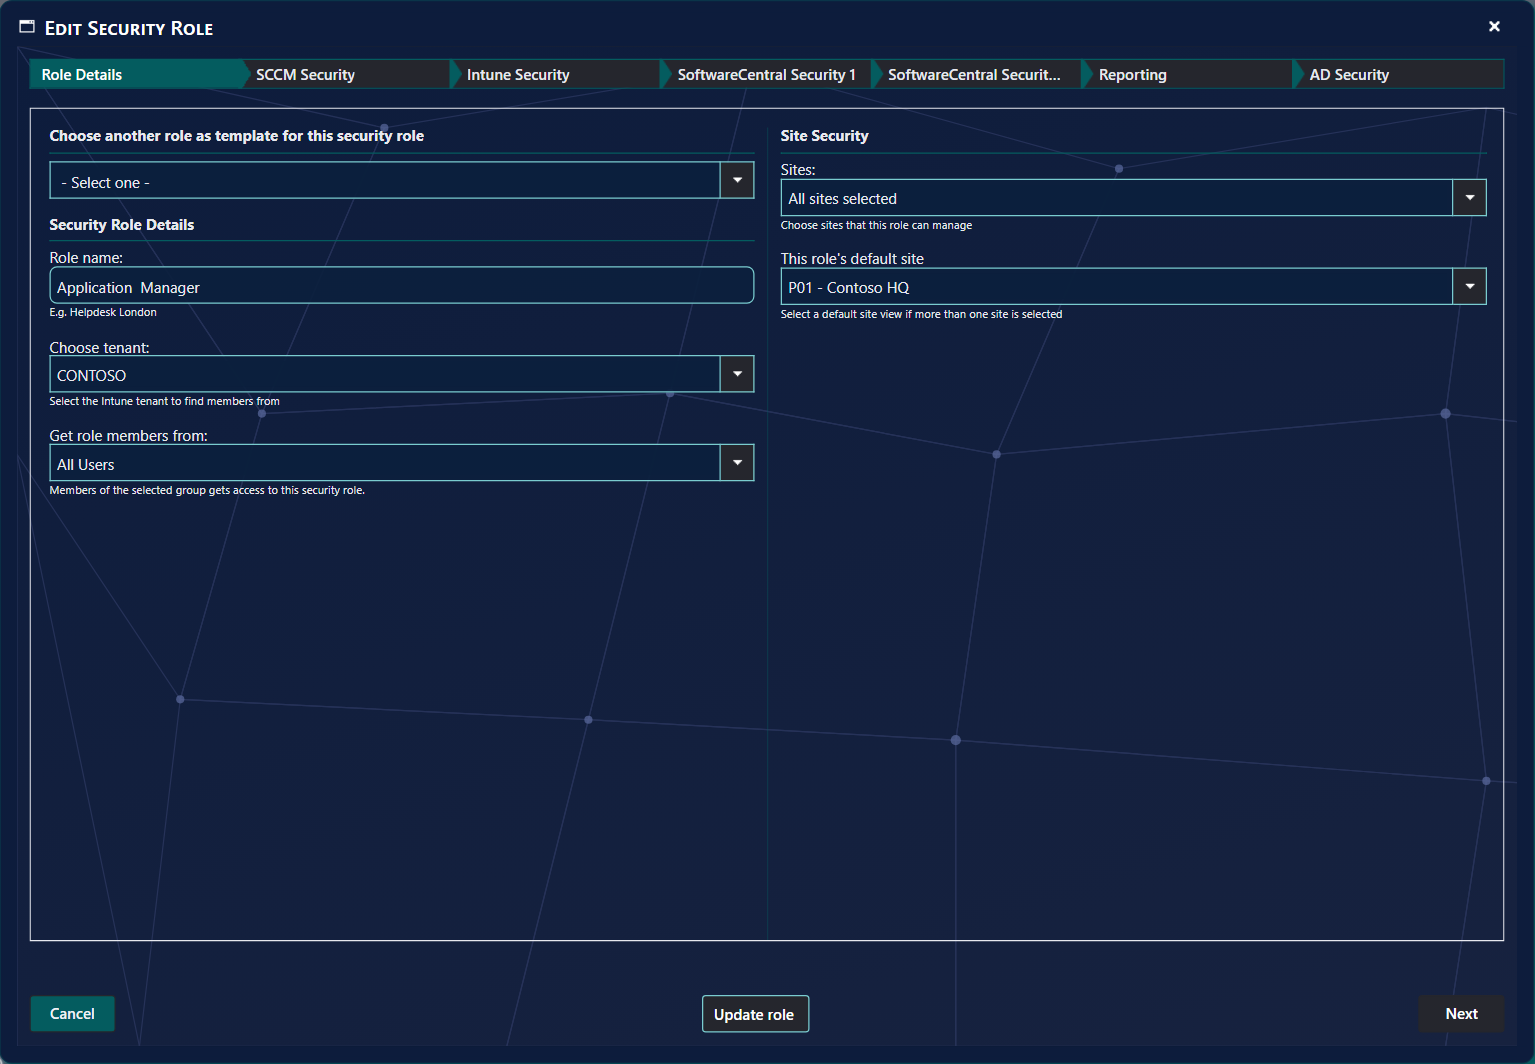
For what each setting means, see the steps in Create a security role.
If you change the Role name, the new name must not be used by another role.
5 Delete a security role
Click Delete on the role. A window asks Do you want to delete Security Role followed by the role name. Click Delete in that window to delete the role, or Cancel to keep it.
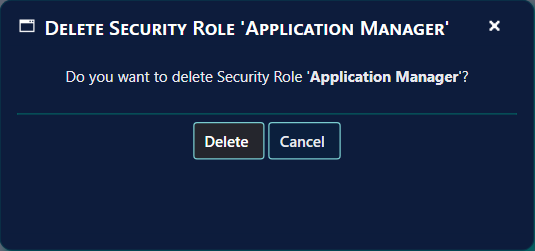
Deleting a role also removes its assignments of application templates, both the SCCM and the Intune ones.
6 Export security roles
Click Export Security Roles in the left menu. A window opens with the list and the columns you can export.
1) Select Columns. Tick the columns to export in the list on the left. The columns that are ticked when the window opens are set in Settings under Default selected columns in Export Security Role.
2) Apply Filters. Choose All filters must apply or At least one filter must apply, then use the drop-down in a column heading, for example Select Names.
3) Export. Click Export. The list is saved as a CSV file with the columns shown. Resize All Columns makes the columns fit the window, and Cancel closes the window.

7 Best practice
- Give each role only what it needs. The Grant rights to all ... options also give the role every new interface, template or report that is added later, so use them only where that is wanted.
- Set Maximum number of resources for roles that work on many devices or users. Enter a whole number: a decimal value is changed to 0, which means no limit.
- Limit Active Directory access with organizational units, and untick Grant full access to the active directory only when the role should work in specific OUs. Tick Locked on an OU where sub OUs must not be chosen when importing a device.
- Check the copied settings when you create a role from another role as a template. Only the name is not copied.
- Remember that Intune group membership is cached for up to an hour; plan group changes ahead of an operation that depends on them.
8 Troubleshooting
| Symptom | Cause | What to do |
|---|---|---|
| "Security role name is undefined" | The Role name is empty. | Type a name, then click Next. |
| "Group is undefined" | No AD group or Microsoft Entra ID group is chosen under Get role members from. | Choose the group. If it is missing, create it in AD first. |
| "No sites selected" | No site is ticked under Sites. | Tick at least one site. |
| "No default site selected" | This role's default site is empty. | Choose a default site. |
| "Portal role name already exists" | Another security role already has this name. The wizard returns to the Role Details step. | Choose another name. |
| "Entered value is not a number" | The Maximum number of resources box holds letters or a decimal number. The value is set to 0. | Enter a whole number. 0 means no limit. |
| "You are only allowed to select 10 resources" | The selection is larger than the Maximum number of resources of your role. The number in the message is your limit. | Select fewer resources, or ask an administrator to raise the limit. |
| Add new Security Role or Export Security Roles is missing | Your role does not have the right to create or export security roles. | Ask an administrator. |
| No Intune Security step | SoftwareCentral is not connected to an Intune tenant. | Connect the tenant first. |
| No Reporting step | Reports are not configured. | Configure reporting; see SCCM Reporting Setup. |
See also: Shop Setup Guide · Assign Packages to Security Groups · Security Roles