1 The PrestageComputer application
To start, create a new share and add all the files from the folder [SoftwareCentralInstallDirectory]\Tools\PrestageComputer\.
For production, you may optionally change the PrestageComputer application's log level. Open the Log.config file and change configuration/log4net/root/level from DEBUG to INFO.
2 Create a boot image
Create a new 64 bit boot image, with the same drivers as the preexisting boot images.
In the ConfigMgr console, go to the Customization tab for the new boot image.
- Check Enable prestart command.
- Add the following command line, where you change the SoftwareCentral address to your own address:
X:\sms\pkg\sms10000\PrestageComputer.exe -url https://softwarecentral
- Check Include files for the prestart command.
- Change the source directory to a share where the PrestageComputer.exe application and its associated files are located.
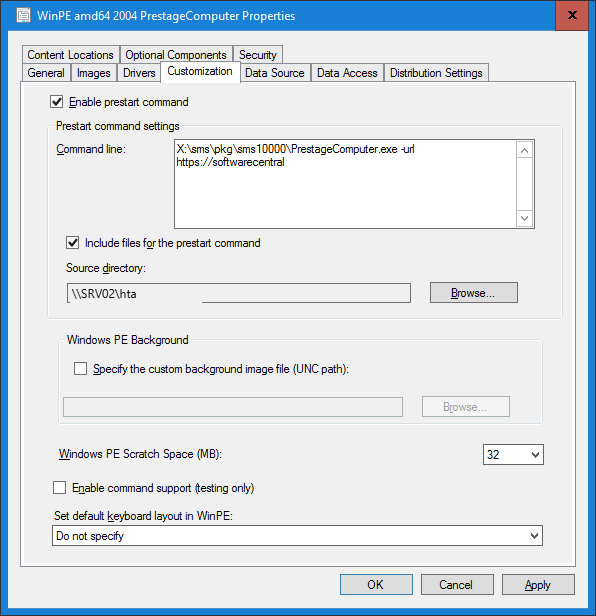
The command line takes pairs of an option and its value. The options are -url, -sslthumbprint and -sitecode. Only -url is required.
For testing you may apply the following settings:
- In the command line, you can add your SSL certificates thumbprint to avoid installing the SSL certificate in your PE environment:
-sslthumbprint "[THUMBPRINT]" - Check Enable command support (testing only).
Next you must go to the Data Source tab.
- Check Deploy this boot image from the PXE-enabled distribution point.
- Change the Architecture to x64.
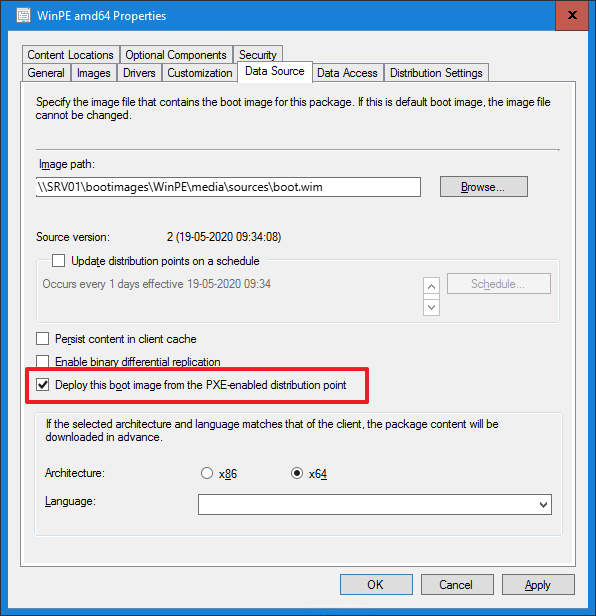
Finally you must distribute the new boot image to the desired distribution points.
3 Create a task sequence
The next step is to create an empty task sequence that will be used to deploy the new boot image.
In the ConfigMgr console, go to Task Sequences and press Create Task Sequence, and a new wizard will open.

- Select Create a new custom task sequence in the first step, as seen above.
- Press Next.
- Name the task sequence, e.g.: SWC Unknown Computers.
- Press Browse.
- Select the newly created boot image.
- Press Next and make sure there is no error.

4 Deploy the task sequence
Open the Create Deployment wizard.
- Select the ConfigMgr standard All Unknown Computers collection as seen below.
- Press Next.
- In the Purpose setting, select Required.
- In Make available to the following setting, select Configuration Manager clients, media and PXE.
- Press Next.
- Schedule the deployment to be available now, and assign the schedule to now.
- The remaining settings may be left with their default values.


You are now ready to import computers.
5 Settings and appearance
The Prestage Computer application can be customized to match your company profile. You can also choose which variables to show and what the users are required to fill in.
These settings are on Settings › Extra Modules › Prestage Computer (New HTA).
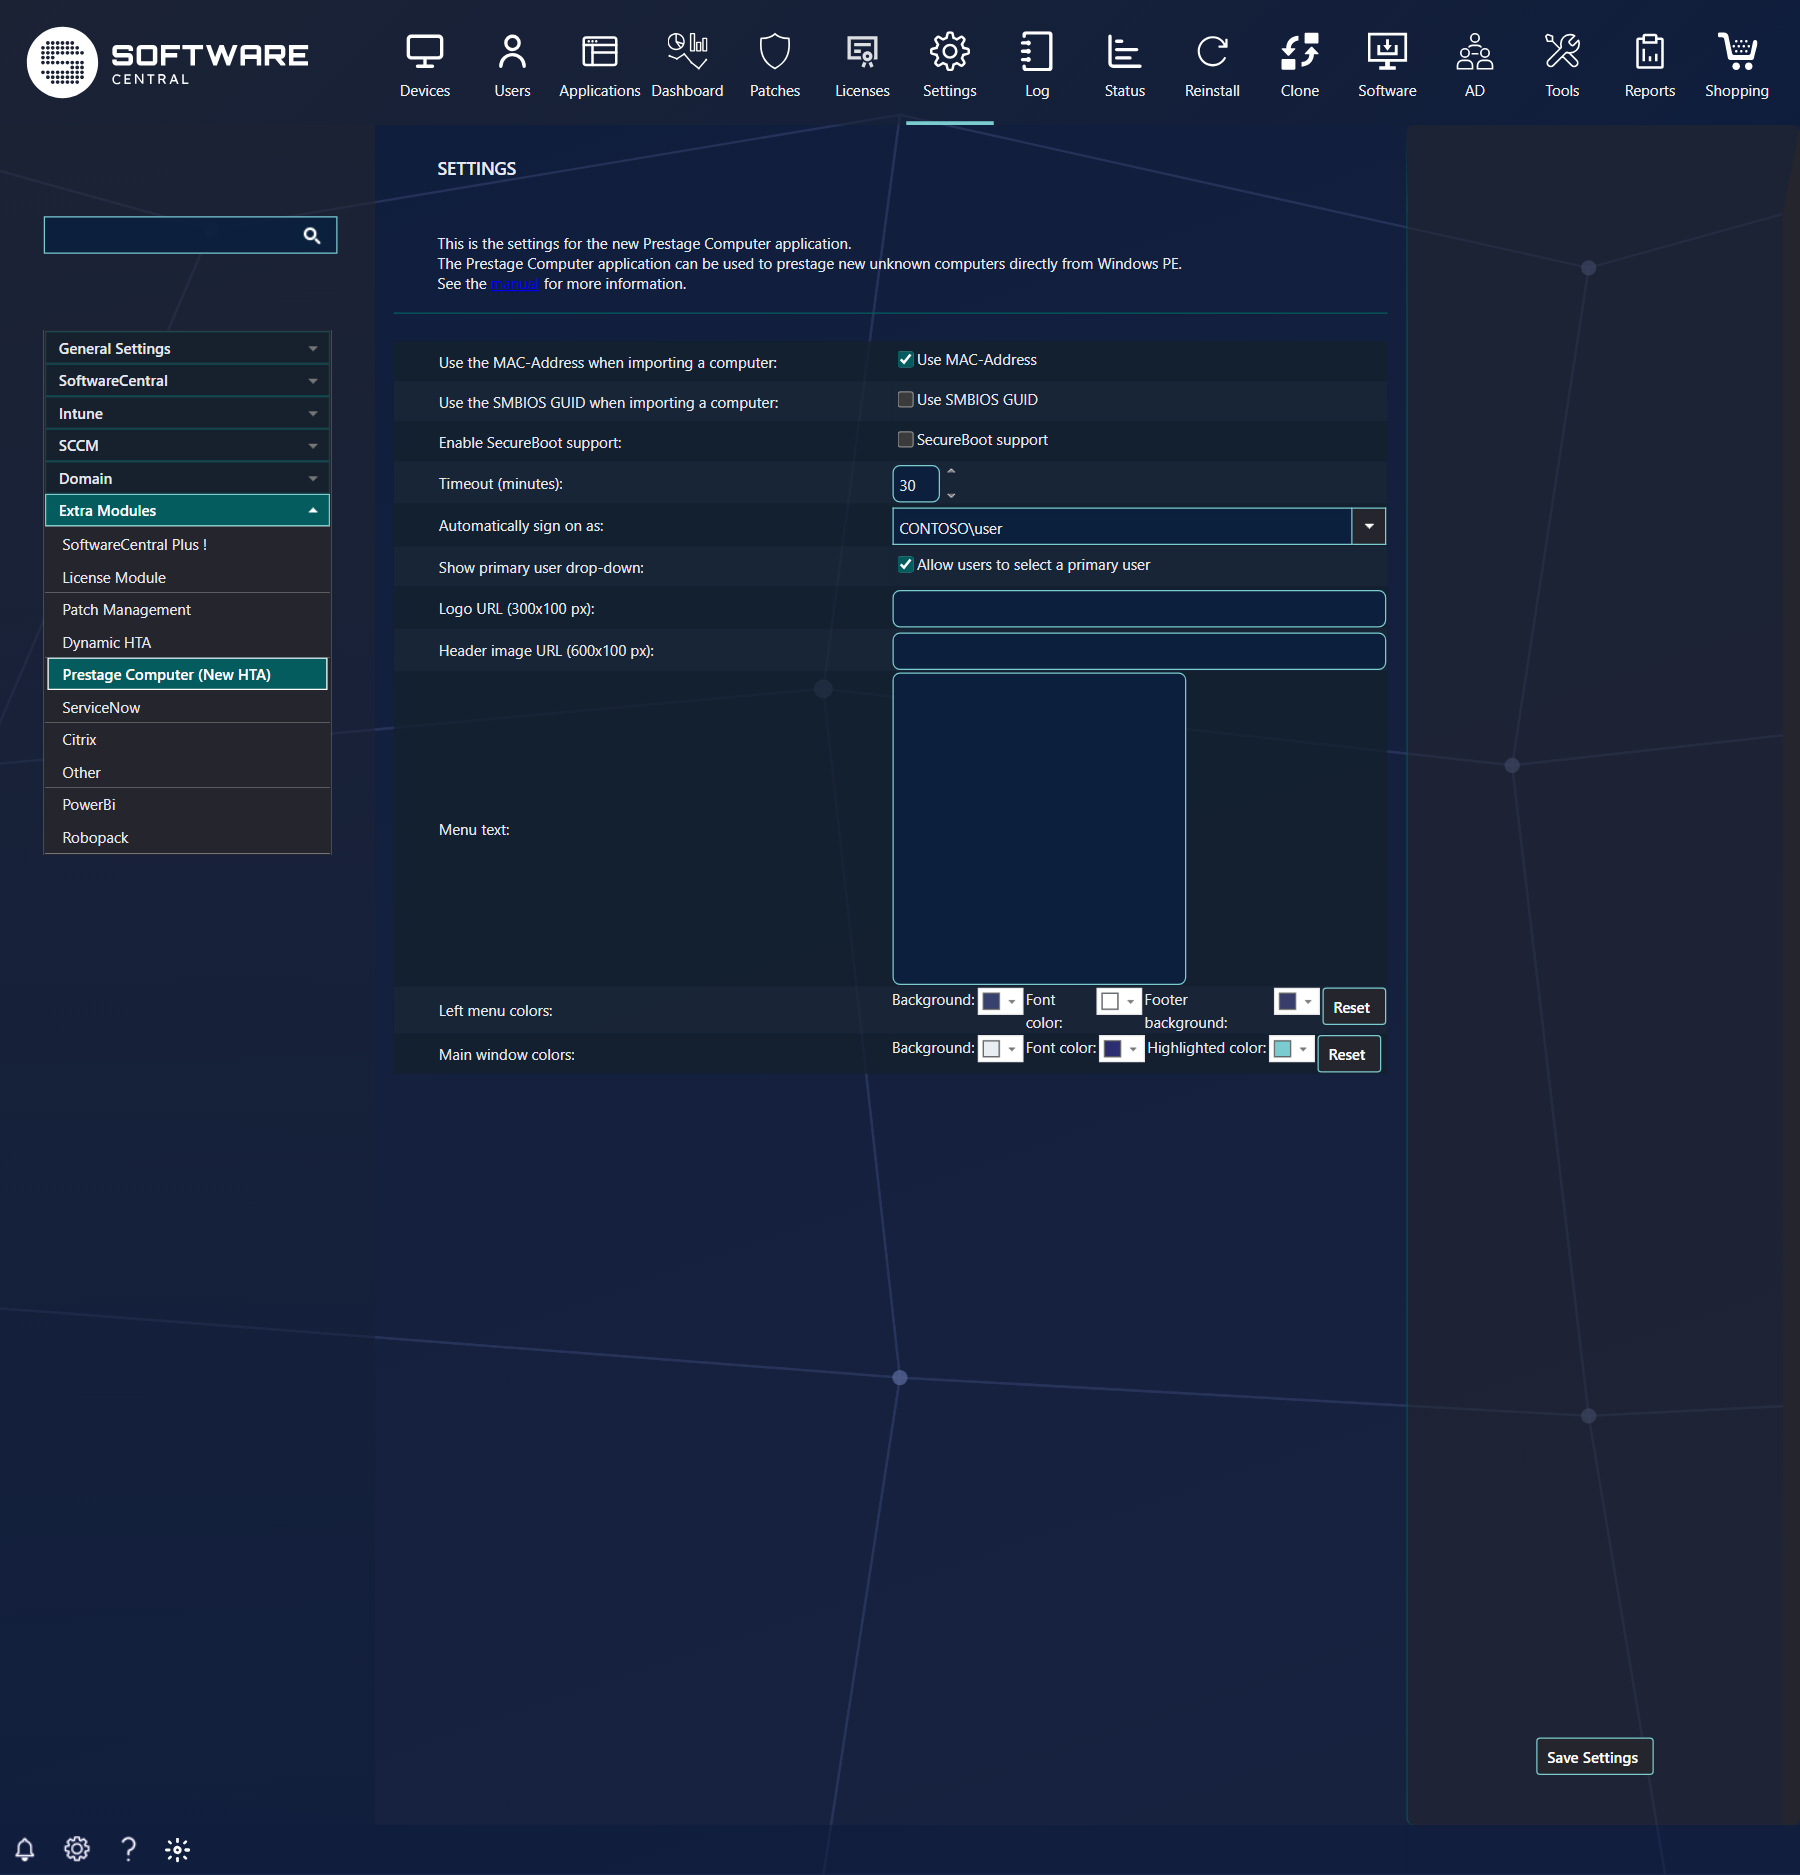
| Setting | What it does |
|---|---|
| Use the MAC-Address when importing a computer | Selected by default. Identifies the computer by its MAC address. |
| Use the SMBIOS GUID when importing a computer | Not selected by default. Identifies the computer by its SMBIOS GUID. |
| Enable SecureBoot support | Not selected by default. See the SecureBoot note below. |
| Timeout (minutes) | The time from when a user has signed on until the application asks for a new sign-on. The default is 30 minutes. Set the value to 0 for an indefinite timeout. After a timeout the application must be restarted. |
| Automatically sign on as | Set a predefined user, so the users of the PrestageComputer app won't have to sign on. The user must be assigned to a security role with permissions to access the app. |
| Allow users to select a primary user | Shows a primary user drop-down in the application. Selected by default. |
| Logo URL (300x100 px) and Header image URL (600x100 px) | The address of the image to show. Leave the field empty to use the default image. |
| Menu text | The text that the application shows in its menu, up to 1,024 characters. |
| Left menu colors and Main window colors | The background, font and highlight colours. Reset sets the colours back to the default colours. |
If the box is empty when you save, the timeout is stored as 0, which means no timeout. Check the value after you save.
You can enable support for SecureBoot.
When you use SecureBoot, you cannot change boot image, as the PrestageComputer application does in its default configuration.
So in those scenarios you add the PrestageComputer app to your default OSD boot image and deploy that to the unknown computers collection.
Then you can use the same boot image when importing an unknown computer and when Windows is installing.
Appearance
You can change the text, logos, and colors from the settings menu in SoftwareCentral.
Logos must be added to the Uploads\Images folder in the SoftwareCentral install directory.
You can then use a URL similar to: https://softwarecentral/Uploads/Images/fileName.png
6 Variables and templates
The variables displayed in the PrestageComputer app are the same as are displayed in the Import Computer interface in SoftwareCentral.
You can choose which variables are available, change their text and change their order from the Machine Variables interface.
From Settings › SoftwareCentral › Interface Settings, tick Hide locked variables if you do not want users to see the locked variables in the PrestageComputer app.
From the Computer Templates interface in SoftwareCentral you can configure the available computer templates.
You can also choose to make variables mandatory and lock variables you do not want the user to be able to change.
Whether users must choose a computer template is decided by the security role they sign on with, not by the settings on this page.
7 Naming
There are three ways to give a computer a name in the PrestageComputer app.
| Way | What happens |
|---|---|
| Type the name manually | The user types the computer name. This is the first entry in the naming list, Manually type a computer name. |
| A naming schema with a counter | The next free number of the counter is reserved for the computer. |
| A naming schema with a format | The name is generated from variables on the computer, for example the serial number. |
Users can type the name manually or they can use a computer naming schema, that uses either a counter or generates the name from some variables on the computer, e.g. the serial number.
A computer template can lock the naming schema, so the user cannot change it.
8 Best practice
- Use HTTPS for the -url address. On plain http the application warns that user names and passwords are sent in clear text, as the note in section 1 says.
- Use a dedicated account for automatic sign-on, with only the rights the application needs. Every sign-on uses that account, and the log messages are written under it.
- Check the timeout after you save. The default is 30 minutes. A value of 0 means that the sign-on never expires.
- Set the log level to INFO for production. In the Log.config file, change the root level from DEBUG to INFO.
- Use the same boot image for import and Windows setup when SecureBoot is on. The boot image cannot be changed while SecureBoot is in use, so add the application to your OSD boot image instead.
9 Troubleshooting
| Symptom | Cause | What to do |
|---|---|---|
| "The SoftwareCentral URL must be passed as the command line argument -url "SOFTWARECENTRAL_SITE_URL"." | The prestart command has no -url argument. | Add -url and the address of your SoftwareCentral site to the command line of the boot image, then update the boot image on the distribution points. |
| "The SoftwareCentral URL is invalid: ..." | The value after -url is not a complete address. | Use the full address, for example https://softwarecentral. |
| "Communication with SoftwareCentral is not secure." and "Usernames and passwords will be sent in clear text." | The -url address starts with http. | Change the address to https and update the boot image. |
| "This computer already have a policy available and SecureBoot support is enabled. The application will close shortly..." | SecureBoot support is on, and the computer already has a policy. | This is expected. Use the OSD boot image route described in the SecureBoot part of section 5. |
| "Token has expired." | The sign-on is older than the Timeout (minutes) setting. | Sign on again. If this happens during normal use, set a longer timeout. |