1 Open the list
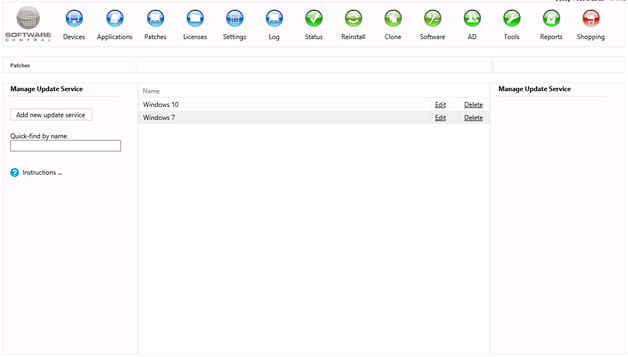
Open the Patches menu in the top bar, then choose Manage Update Service.
The update service is the key part of patch management. It brings everything together so that the right patches are downloaded and deployed to the right collections. Each update service automatically looks for new patches, downloads them and deploys them to a test collection. Your job is then to approve the updates.
The page lists every update service with its Edit and Delete links. On the left you find the Add new update service button and a search box to find an update service quickly.
2 Create an update service
Click Add new update service. A window opens with a guide of five steps. Each step is needed to create the update service, and the window is saved only when every step is filled in.
The Save button stays greyed out until the update service has a name, a test collection, a target collection, a search folder, an update package and, if you choose Save settings as new template, a template name. The steps follow in the next section.
3 The five steps
The window is a list of five steps, shown as the bars 1. Select test Collection to 5. Select template. Open a bar to fill it in. The name box at the top is shared by all steps.
| Step | What you do |
|---|---|
| Name (top of the window) | Type the name of the update service. The name is shown at the top of the window and must be filled in before Save is available. |
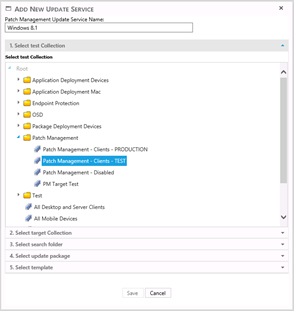
| 1. Select test Collection | Browse the tree and select the test collection. The tree starts at the SCCM root device collection. The test collection is used to deploy the patches automatically first, so it must hold a small representation of the devices that the patches are meant for. |
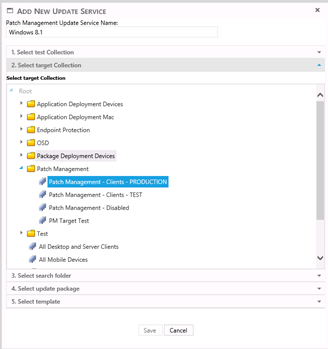
| 2. Select target Collection | Browse the same tree and select the target collection: the collection that holds all the devices that need the updates. It must not be the same as the test collection. |
| 3. Select search folder | Choose an existing search folder, or click Create new. See step 3 below. |
| 4. Select update package | Choose an existing update package, or click Create new. See step 4 below. |
| 5. Select template | Choose an existing template, or set the flags and tick Save settings as new template. See step 5 below. |
Step 1 and 2: the collections
The collections are shown as a tree. Select the collection you want, and it is shown in the bar when you close it.
Step 3: search folder
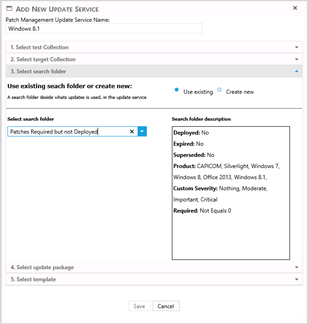
A search folder decides which updates are used by the update service. Select an existing one in the drop-down. When you select it, its description appears in the Search folder description box.
If none of the existing search folders meets your need, click Create new. The window then shows the criteria for a new search folder. Type a Search Folder Name, and set the criteria you need. The drop-downs for Downloaded, Deployable, Deployed, Expired and Superseded start on Yes. Date Released starts on Last 1 hour, and Required starts on More than 0. Change them to match the updates you want. The criteria also include Classifications, Products and Severities. When you save, the new search folder also appears in the search folder interface.
For more information, see Search Folders.
Step 4: update package
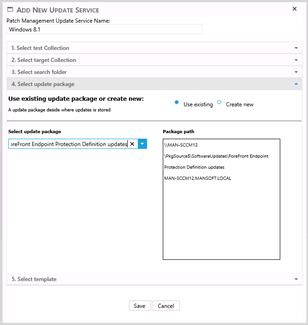
The update package decides where the patches are downloaded to and where they are distributed from. Select an existing one in the drop-down, and a short description appears in the Package path box.
If none of the existing packages meets your need, click Create new. Enter the Patch Management Package Name and the Patch Management Package Source Path, then select the distribution points in the list under Patch Management Package Distribution Points. When you save, the new package also appears in the patch management package interface.
For more information, see Deployment Packages.
Step 5: template
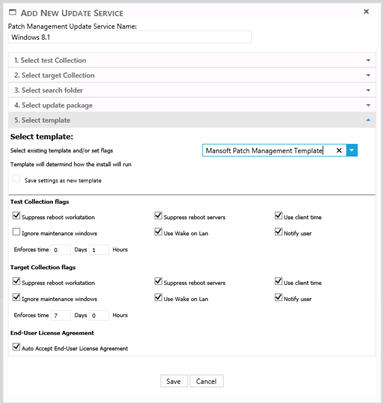
The template sets how the flags on the test collection and the target collection are applied. Select an existing template in the drop-down. If none of the existing templates meets your need, tick Save settings as new template. A Template Name box appears; type the name, and it is saved when you click Save. The new template also appears in the patch management template interface.
The step has these settings. The test collection and the target collection each have the same flags:
| Setting | What it does |
|---|---|
| Suppress reboot workstation | Sets the reboot option for workstations in the deployment of that collection. |
| Suppress reboot servers | Sets the reboot option for servers in the deployment of that collection. |
| Use client time | Sets the client time option for the deployment of that collection. |
| Ignore maintenance windows | Sets the maintenance window option for the deployment of that collection. |
| Use Wake on Lan | Sets the Wake on LAN option for the deployment of that collection. |
| Notify user | Sets the user notification option for the deployment of that collection. |
| Enforces time: Days and Hours | The enforcement period for the deployment of that collection. Each collection has its own boxes. |
| Auto Accept End-User License Agreement | One setting for both collections. When it is ticked, the licence terms of the patches are accepted for the test deployment. |
4 What happens when you save
When every step is filled in, click Save. The window closes and the update service is created.
The update service does not start straight away. The daily tasks of the SoftwareCentral service check each update service that has no test deployment running. If the search folder has updates that meet its criteria, the daily task creates a new deployment for the test collection. Until then the update service waits.
5 Edit an update service
Click Edit on the row of the update service. The window opens with all the settings filled in. Change what you need, then click Save.
The new settings are applied the next time the update service runs.
6 Delete an update service
Click Delete on the row of the update service. A confirmation window shows the name of the update service. Click Delete in that window to delete the update service.
Only the update service is deleted, together with its assignment records in the SoftwareCentral database. The search folder, the update package and the template of the update service are not deleted. Delete them in their own interfaces if you no longer need them.
7 Best practice
- Use a small, representative test collection. The patches go to the test collection first, so it should hold a few devices that stand for the rest of your estate. A test collection that is too small or too unlike your devices misses problems that the target collection will meet.
- Give the test and target collections different devices. Save stays greyed out when both are the same, so pick the target collection before you save.
- Read the licence terms before you tick Auto Accept End-User License Agreement. When it is ticked, the licence terms of the patches are accepted automatically for the test deployment, so make sure you accept them.
- Plan for the daily run. A new update service creates its test deployment on the next daily run, so allow a day before you expect the first deployment.
- Keep search folders, packages and templates you still use. Deleting an update service leaves them in place, which is what you want when another update service uses them.
8 Troubleshooting
| Symptom | Cause | What to do |
|---|---|---|
| Save stays greyed out, with no message | The test collection and the target collection are the same, or a required field is empty: the name, a collection, a search folder, an update package, or the template name when Save settings as new template is ticked. | Pick a different target collection, and fill in the empty field. |
| The list shows No update service match your criteria | The search box has text that no update service contains, or no update service has been created yet. | Clear the search box, or click Add new update service. |
| The Log shows Collection '...' doesn't exist in sccm at site '...' when you edit an update service | The collection saved in the update service is no longer in ConfigMgr. | Select another collection in the tree for that step, then click Save. |
| The Log shows Failed to load update service interface. or Failed to load properties for template. | The window could not read the update service or its template. The Log entry at the same time has the detail. | Read the Log entry, then open the window again. If it keeps failing, pass the entry to your SoftwareCentral administrator. |
| The Log shows Failed to delete the update service from datebase. | The database did not delete the update service. | Read the Log entry, then try the delete again. |
| No test deployment appears after you save | The daily run has not happened yet, no update in the search folder meets its criteria, or the installation is Intune-only. | Wait for the next daily run. Check the search folder criteria in the search folder interface. |